Continuous Testing with Azure DevOps TAU Course
Links
- TAU course Continuous Testing with Azure DevOps
- Repo: MaksimZinovev/automation-bookstore-yaml: Sample project for TAU course Continuous Testing with Azure DevOps. Multi-stage YAML pipeline.
- Azure DevOps Pipeline Tutorial — Part 1: CI pipeline fundamentals
Introduction
Bushra Alam, instructor for this course.
Connect: LinkedIn, Twitter.
YouTube channel .
Lessons Learned
- Task: AzureRmWebAppDeployment@4 - syntax. Service connection name can be used instead of subscription name.
- lightwaver/ymlbuildpipelinepreview - useful VS Code extension to validate yaml file for Azure pipeline without running pipeline.
- Azure extension allows to view and control Azure resources from VS Code.
- When troubleshooting issues, first things to check are typos, incorrect paths. In most cases issues can be resolved quickly.
- AI assistant can be helpful. It saves time on reading documentation and googling.
- Good practices
- add
display namefor each task in pipeline; - use parameters instead of hardcoded values; for example, parametrise base url, browser.
- instead of rewriting config file, it would be better to use environment variables or command line arguments to override the default configuration values.
- add
- When something does not work, try to be flexible and find workaround. Read error message and try to understand it, what could go wrong. Bug or other issues like incompatibility issues are pretty common. Try to search for workaround suggested by other people (GitHub, StackOverflow, etc), ask AI.
1. Introduction to Azure DevOps
Azure - Azure is a cloud computing service provided by Microsoft for building, testing, deploying, and managing applications.
The term DevOps is a compound of "development" and "operations".
Dev is used as a shorthand for developers and includes all the people involved in developing the product, so that includes QA engineers as well.
And Ops is a blanket term for system engineers, system administrators, operation staff, release engineers, DBAs, network engineers, security professionals and various other sub-disciplines.
DevOps is defined in many ways, but what I feel truly captures the essence of DevOps is the definition that is used by Microsoft.
It says, "DevOps is the union of people, process, and technology to continually provide value to customers."
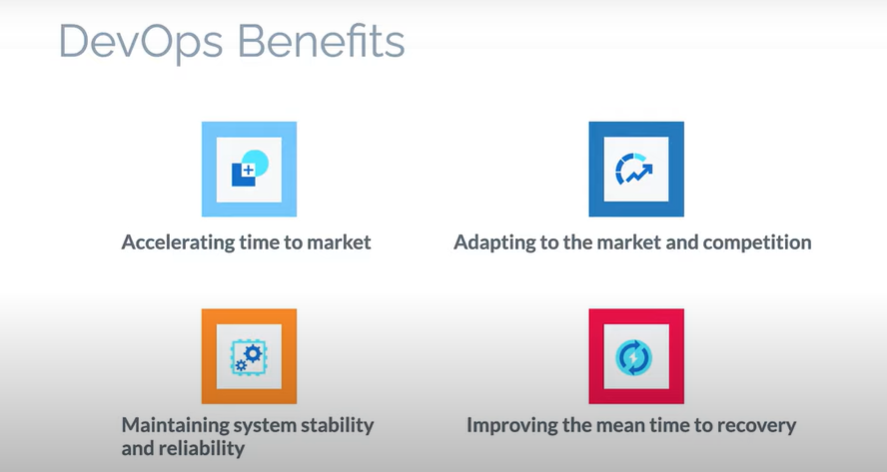
DevOps influences the complete application life cycle.
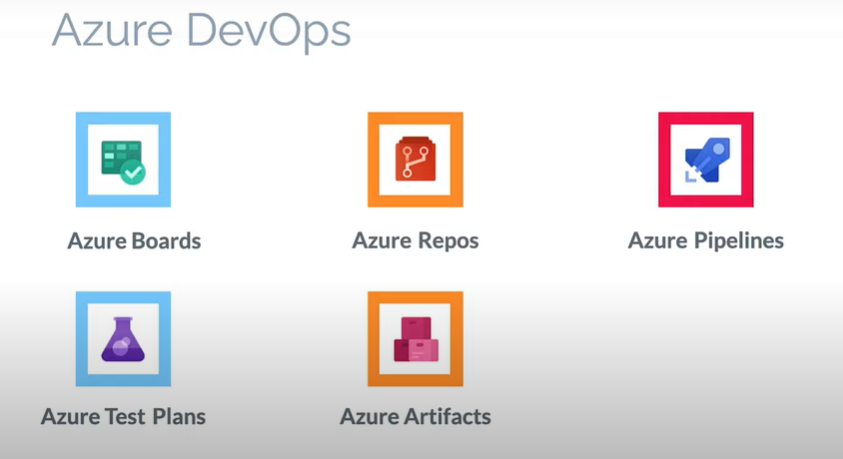
2. Azure Pipelines
Tasks:
- Create azure pipeline using GitHub repo https://github.com/bushralam/automation-bookstore
Create Azure Pipeline
- Azure organization > Azure project > Pipelines > Pipelines
- Where is your code > GitHub > Select repo > sign into GitHub account > allow permissions and confirm installing GitHub app (Azure pipelines)
- Configure pipeline > HTML
- Review
- Complete Parallelism request form - Azure DevOps Parallelism Request. See this answer on SOF azure devops - How to resolve "No hosted parallelism has been purchased or granted" in free tier? - Stack Overflow
- Wait for approval 2-3 business days
- Save and run pipeline
YAML pipeline
# HTML
# Archive your static HTML project and save it with the build record.
# Add steps that build, run tests, deploy, and more:
# https://aka.ms/yaml
trigger:
- master
pool:
vmImage: ubuntu-latest
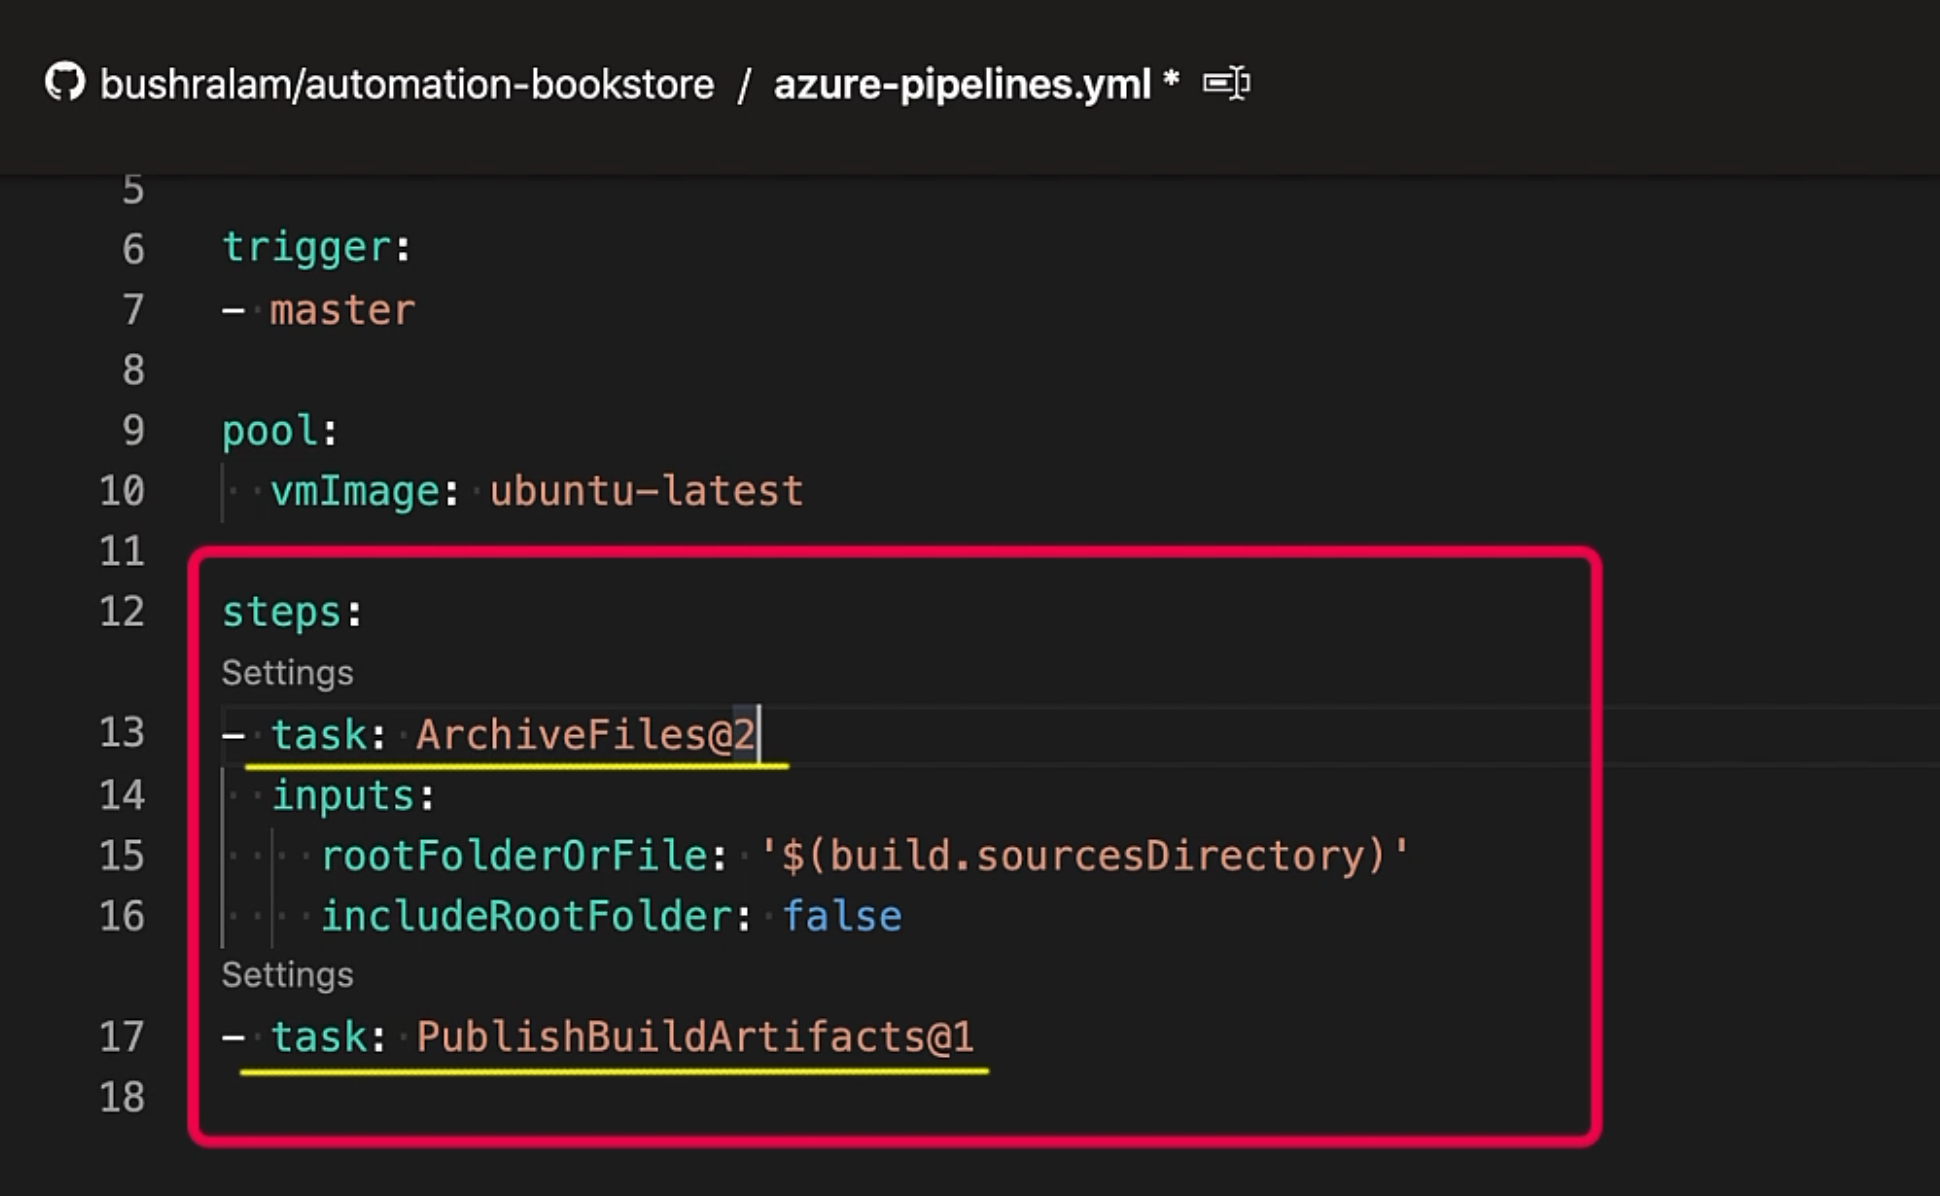
steps:
- task: ArchiveFiles@2
inputs:
rootFolderOrFile: '$(build.sourcesDirectory)'
includeRootFolder: false
- task: PublishBuildArtifacts@1
-
YAML pipeline explained:
This is a YAML file defining an Azure Pipeline that performs two tasks:

1.  ArchiveFiles: This task archives the source code located in the build.sourcesDirectory folder. It includes all files and folders inside that folder and doesn't include the root folder itself.

2.  PublishBuildArtifacts: This task publishes the archived build artifacts to the Azure Pipelines artifacts repository, where they can be accessed and used in subsequent stages of the pipeline.


The pipeline is triggered to run automatically when changes are made to the master branch of the source code repository. It uses a virtual machine with the latest Ubuntu image as the build agent.
Trigger
Trigger - set on the master branch - meaning, if there's any code push in the master branch, the build pipeline will trigger.
We can also have multiple branches here.
We can also have a more complex case, where we need to include some branches and exclude some.
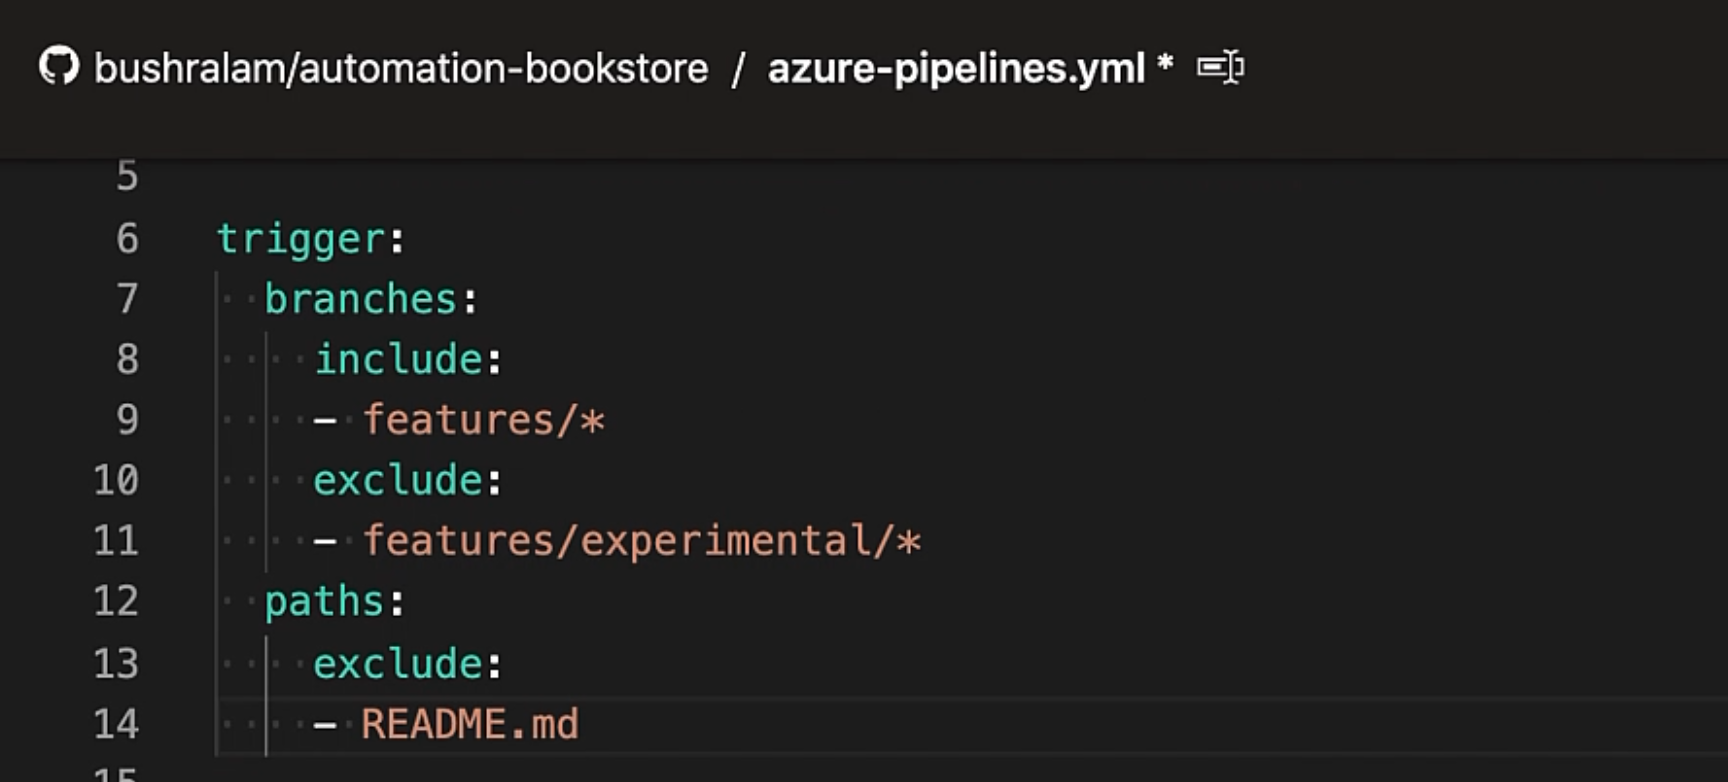
Here, we have excluded the README file, so any changes done to this file will not trigger the build.
And, if you would like to disable the CI builds entirely, then we can specify none.
Pool
pool specifies the details of the agent pool that we would like to work with.
An agent is a machine that will run our jobs.
Agents aren't managed individually, but rather, in groups.
So, that's an agent pool - a group of agents.
An agent could be a Microsoft hosted agent, or a self hosted agent.
If it's a self hosted agent, then we need to specify the private pool name.
If it's a Microsoft hosted agent, then we don't need to specify any name, but we need to specify the virtual machine image we want to use.
So here we have specified the vmImage to be used as ubuntu-latest.
Instead of Ubuntu, we could also specify macOS-latest or windows-latest.
Steps
A step is a linear sequence of operations that make up a job.
A step can either be a task or a script or a reference to an external template.
Here, we have two tasks.
Tasks
A task is simply a packaged script that has been abstracted with a set of inputs.
The first task is ArchiveFiles@2 - this will archive our project, so that we have a zip file available.
The second one is PublishBuildArtifacts@1 - this will publish the build artifact that is the zip of a project, so that we have it available for the release pipeline.
Here, we have some inputs for this task.
We can update the task settings using the "Settings" link.
If you would like to add a new task, click on "Show assistant" and search for your task (ex. "copy files"), provide the inputs, and click on "Add".
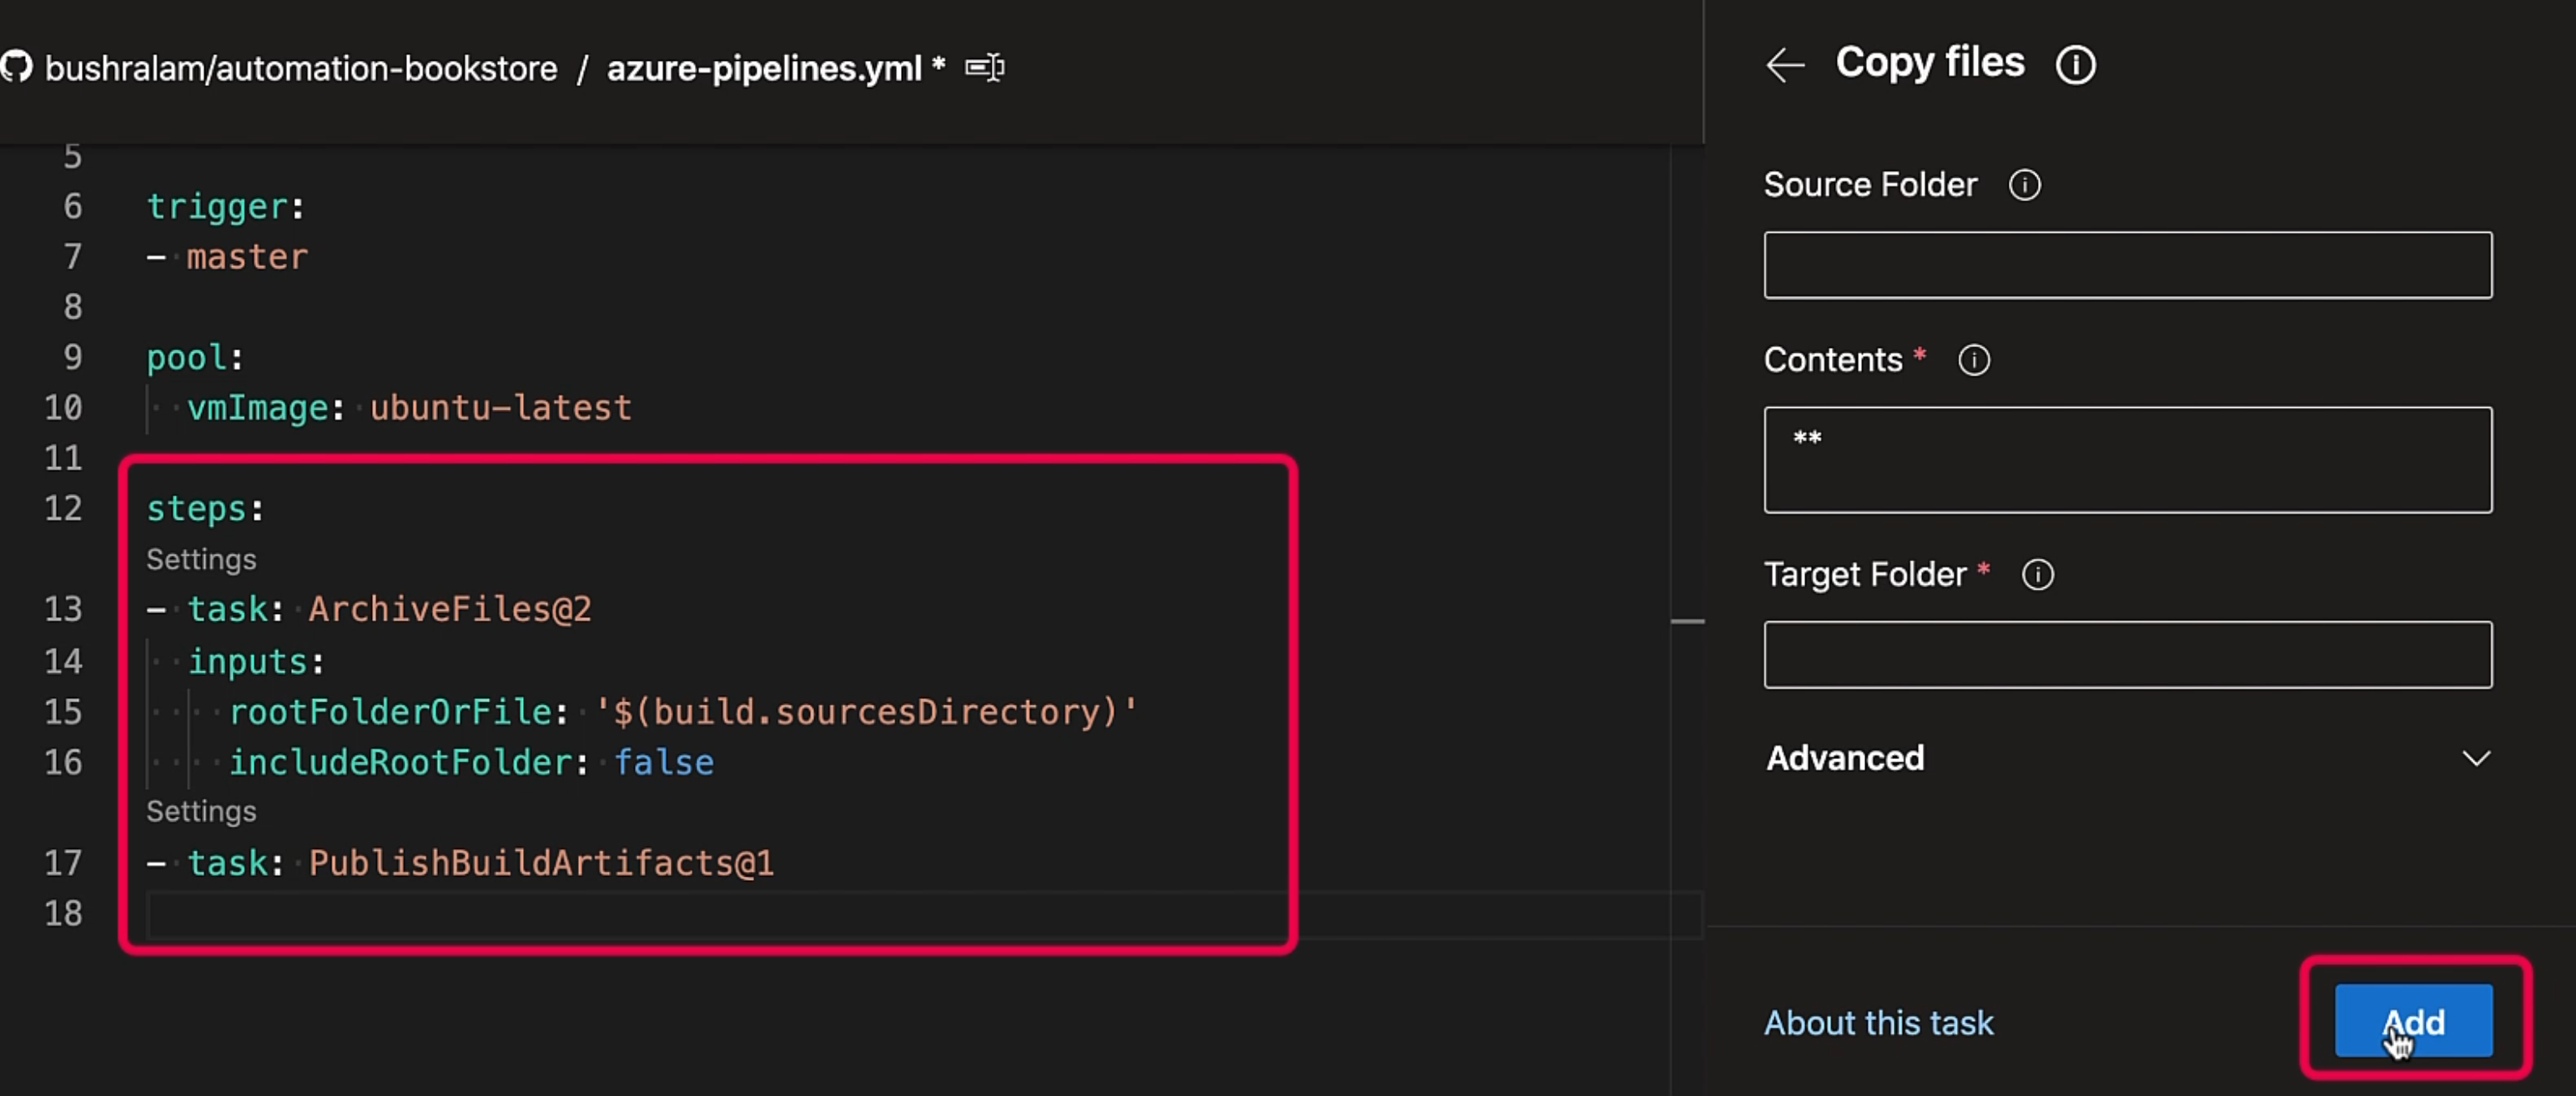
So, our task has been added here.
I've attached a document as a resource, which is a detailed reference guide to Azure Pipeline's YAML schema.
For now, we are satisfied with this YAML file, and so we'll hit "Save and run".
This will save our YAML file in the code repository and will run a build.
Our build has been triggered; our job is currently queued.
Create Manual Release Pipeline Using Classic Editor
Prerequisites:
- Create web app using Azure app service
Steps
- Azure organization > Azure project > Pipelines > Releases > New pipeline
- Select a template > close
- Add artifact > Build > select artifact created in azure pipeline
- Add stage > Select Azure App service deployement > rename stage " dev"
- Select App type > Windows / Linux etc.
- Tasks > Stage > Parameters > Azure subscription > Manage ( or select existing subscription - skip step 6)
- Service connection > New service connection > Select Azyre resource manager
- Sign in > Select scope level > Subscription > Select resource group > Enter service connection name > Save
- Releases > Tasks > Stage > Parameters > Azure subscription > select created subscription
- Select app service name
- Save
- Create release > For manual, do not select any stages to trigger release deployement
- Create
- Go to Release > Dev > Logs > Observe tasks completed
- Initialize job
- Download artifact
- Deploy Azure app service
- Finalize job
- Check the website
To deploy changes
- Update the code and push changes to repo
- Open pipelines
- Select pipeline
- Run pipeline
Create Automatic Release Pipeline Using Classic Editor
Prerequisites:
- Create manual release pipeline
Steps
- Azure organization > Azure project > Pipelines > Releases >Select pipeline
- Edit
- Select Artifacts > Continuous deployemen trigger > Enable
- When new artifact (build) is generated > deployement is triggered automatically
- Open code in master branch
- Update code
- Commit changes and push to GitHub
- Observe build pipeline is executed and release deployement is triggerd automatically
- Once deployement has finished observe changes in the website
3. Writing Tests
Some common challenges of continuous testing include:
- Scalability issues - we do not want running end-to-end tests to be a bottleneck in the CI/CD pipeline. We desire fast execution and the ability to run tests in parallel. Selecting the right tool and framework is essential.
- Test data management - creating and maintaining multiple dataset versions for different environments and tests is challenging.
- Testing scope - as the product grows, so does the number of tests. Running tests may take hours, and so quick feedback isn't achieved. On the other hand, if you run only a subset of the test, then we may be compromising on the product quality. So choosing the right test and the right number of tests is essential.
Creating Cypress tests
cd e2e
npm init -y
npm install cypress
npx cypress open
We'll go ahead and remove the examples folder and add a new file search.spec.js to hold our test, and we'll add the test.
describe('Search for books', () => {
    beforeEach(() => {
        cy.visit('http://abookstore.azurewebsites.net/')
    })

    it('should return one book with title Agile Testing', () => {
        const title = 'Agile Testing'
        const expectedCount = 1

        // Search
        cy.get('#searchBar').type(title, { delay: 250 })

        // Verify count
        cy.get('li:not(.ui-screen-hidden)').should('have.length', expectedCount, `There should be exactly ${expectedCount} book(s) visible`)

        // Verify book title
        cy.get('h2').should('contain.text', title, `${title} should be visible`)
    })

    it('should return multiple books with title Test', () => {
        const title = 'Test'
        const expectedBooks = [
            'Test Automation in the Real World',
            'Experiences of Test Automation',
            'Agile Testing',
            'How Google Tests Software',
            'Java For Testers']
        const expectedCount = expectedBooks.length

        // Search
        cy.get('#searchBar').type(title, { delay: 250 })

        // Verify count
        cy.get('li:not(.ui-screen-hidden)').should('have.length', expectedCount, `There should be exactly ${expectedCount} book(s) visible`)

        // Verify book titles
        expectedBooks.forEach(b => cy.get('h2').should('contain.text', b, `${b} should be visible`))
    })
})
Update package.json:
{
  "name": "e2e",
  "version": "1.0.0",
  "description": "",
  "main": "index.js",
  "scripts": {
    "test": "cypress run"
  },
  "keywords": [],
  "author": "Bushra Alam",
  "license": "ISC",
  "dependencies": {
    "cypress": "^7.5.0"
  }
}
Now to run a test, we need to run the command
npm test
Update .gitignore
e2e/node_modules/
e2e/cypress/screenshots
e2e/cypress/videos
Commit changes and push to remote repo.
4. Adding Tests to Azure Pipeline
Links:
System.DefaultWorkingDirectory is a predefined system variable, and it holds the local path on the agent where the source code files are downloaded.
NPM task does not allow env variables. Use "command line script" task instead.
Main Steps - Add Tests to Release Pipeline
- Add agent job to stage
- Add task: Extract files
- Add task: Install Nodejs
- Add task: npm install dependencies
- Add task: command line script
- Save pipeline
- Release pipeline > Create release
Detailed Steps - Add Tests to Release Pipeline
- Stage > add agent job
- Update display name: E2E test
- Agent pool: Azure pipelines
- Agent specs: ubuntu-20.04
- E2E test > add task
- Task: extract files > file patterns > leave as it is
- Task: extract files > destination folder >
$(System.DefaultWorkingDirectory)/abs. Because it's a variable, it is wrapped in$()and theabsfolder will be created under that directory and will store the extracted project files. - Mark: Clean destination folder before extracting
- Task > add > Node.js tool installer
- Task > Node.js tool installer > Version Spec > 12.x (Cypress requirements)
- Task > add > npm install > change name to Install dependencies > command ci (clean install of dependencies) > Working folder >
$(System.DefaultWorkingDirectory)/abs/e2e-tests(where package.json is located) - Task > add > command line script > Name > Run tests >
npm run test> Advanced >$(System.DefaultWorkingDirectory)/abs/e2e-tests - If we need to provide env variables > Pipeline > variables > add > Name >
API_Key> value > make secret > paste value - Tasks > Run tests > Environment variables > add > name >
API_KEY> value$(API_Key). - Save release
- Create Release > create
5. Publishing Results in Pipelines
JUnit test result format CANNOT set screenshots and videos generated during test run as attachments in the test report.
Main Steps - Publishing Results in Pipelines
- Edit release pipeline
- Stage: E2E Test > Add task > publish test results
- Cypress project : Set JUnit as a reporter in cypress.config.js
- Publish test results: update search folder
- Publish test results: update control options
- Save release pipline
- Create release
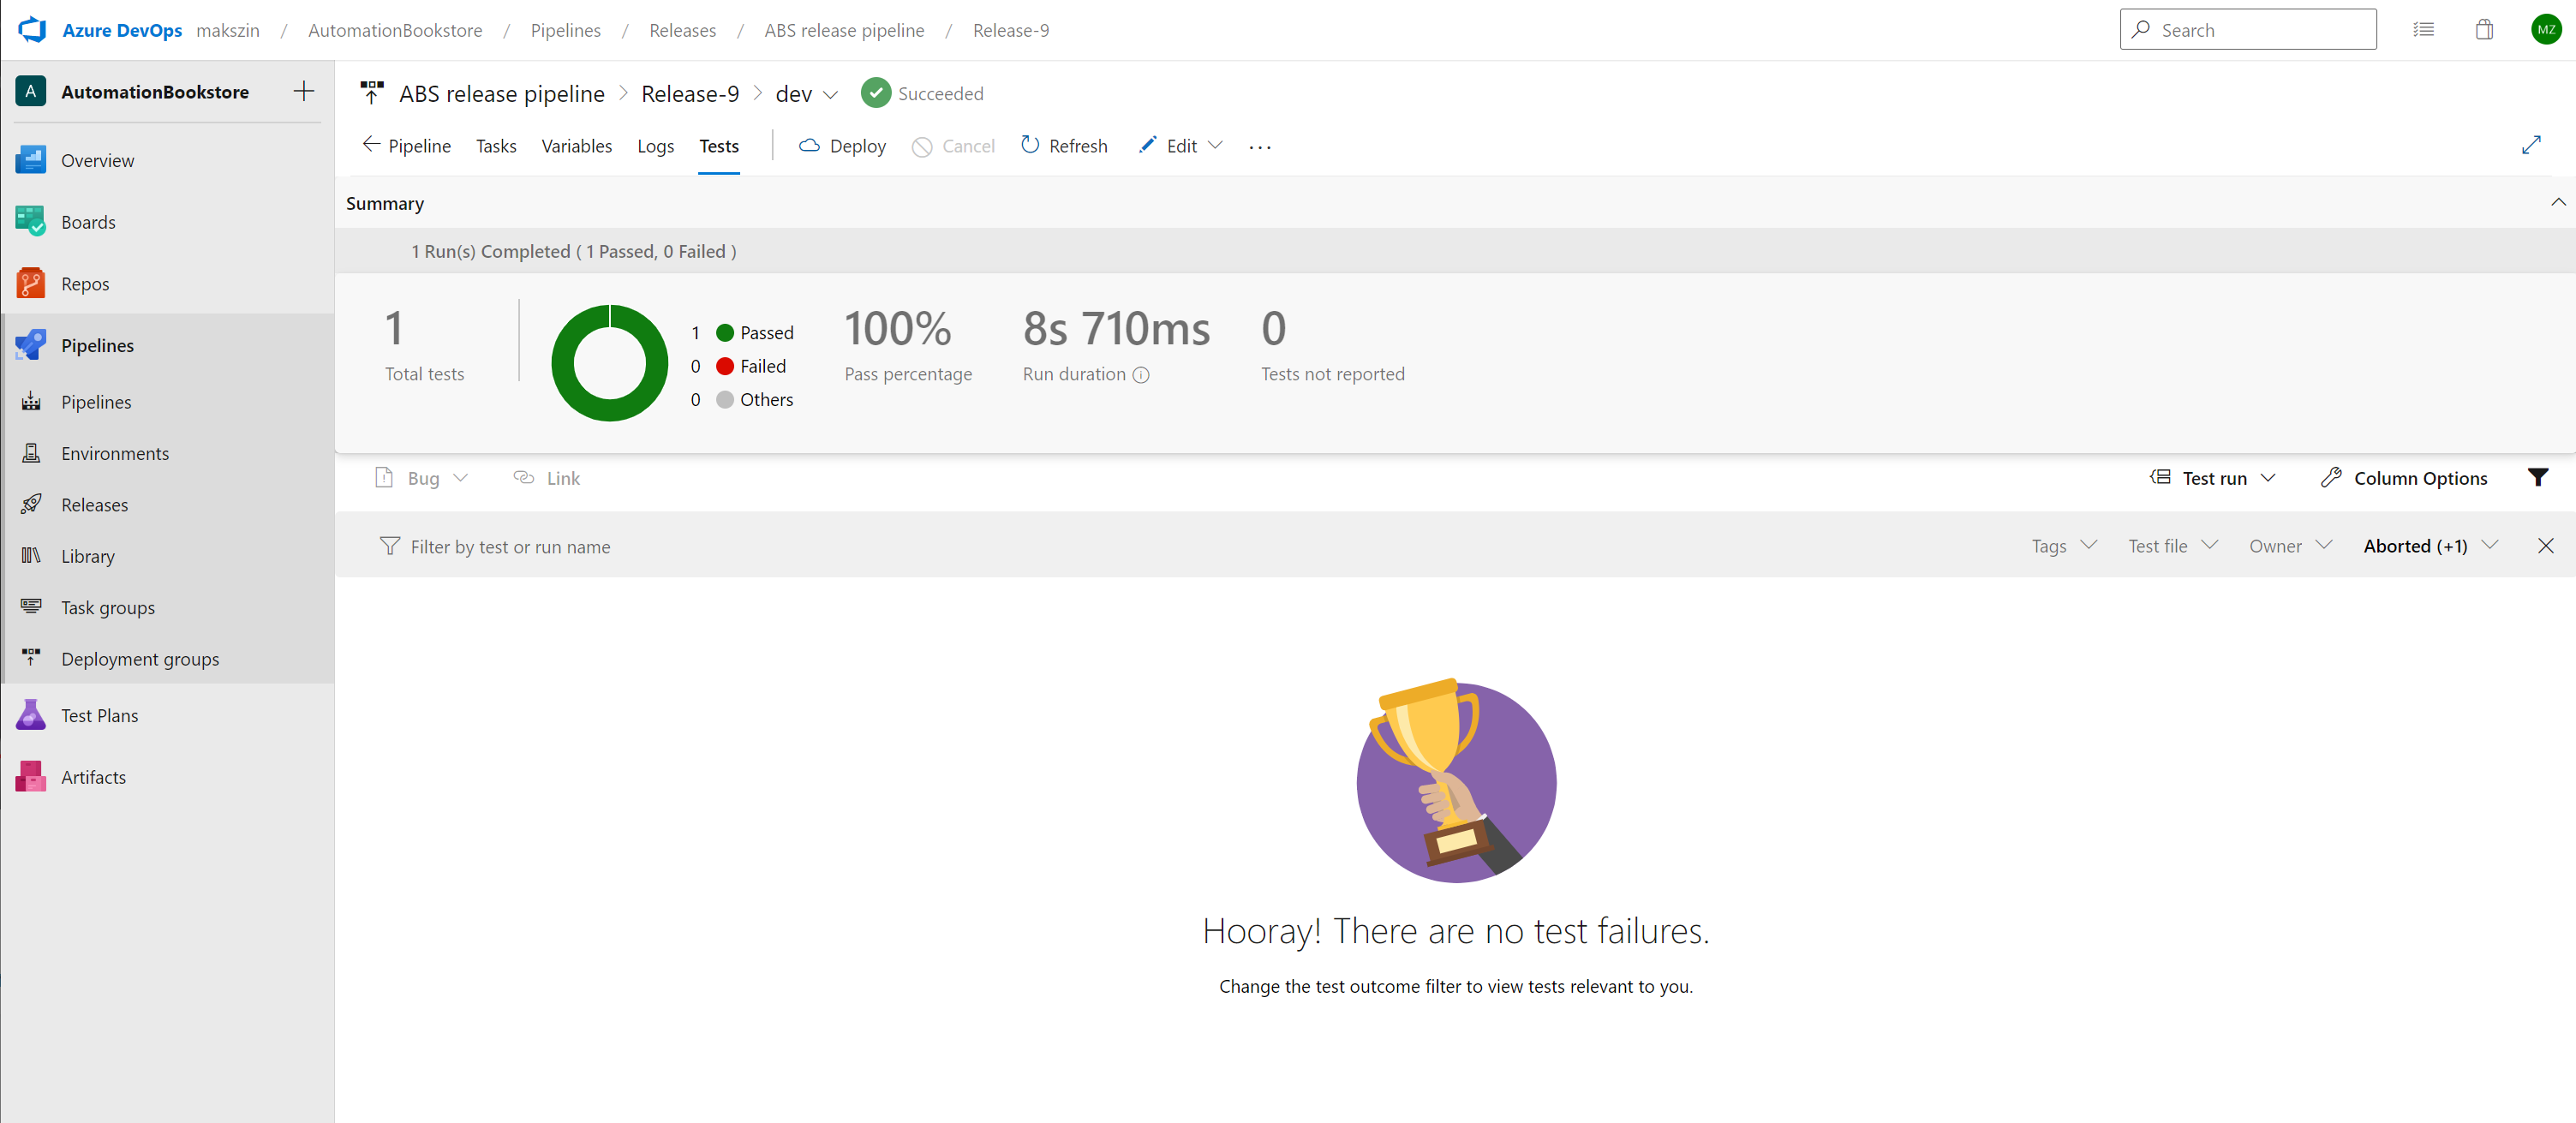
- Release pipeline: check results in Tests tab
Detailed Steps - Publishing Results in Pipelines
- Edit release pipeline
- Stage: E2E Test > Add task > publish test > select publish test results to Azure
- Update name > Publish Test Results
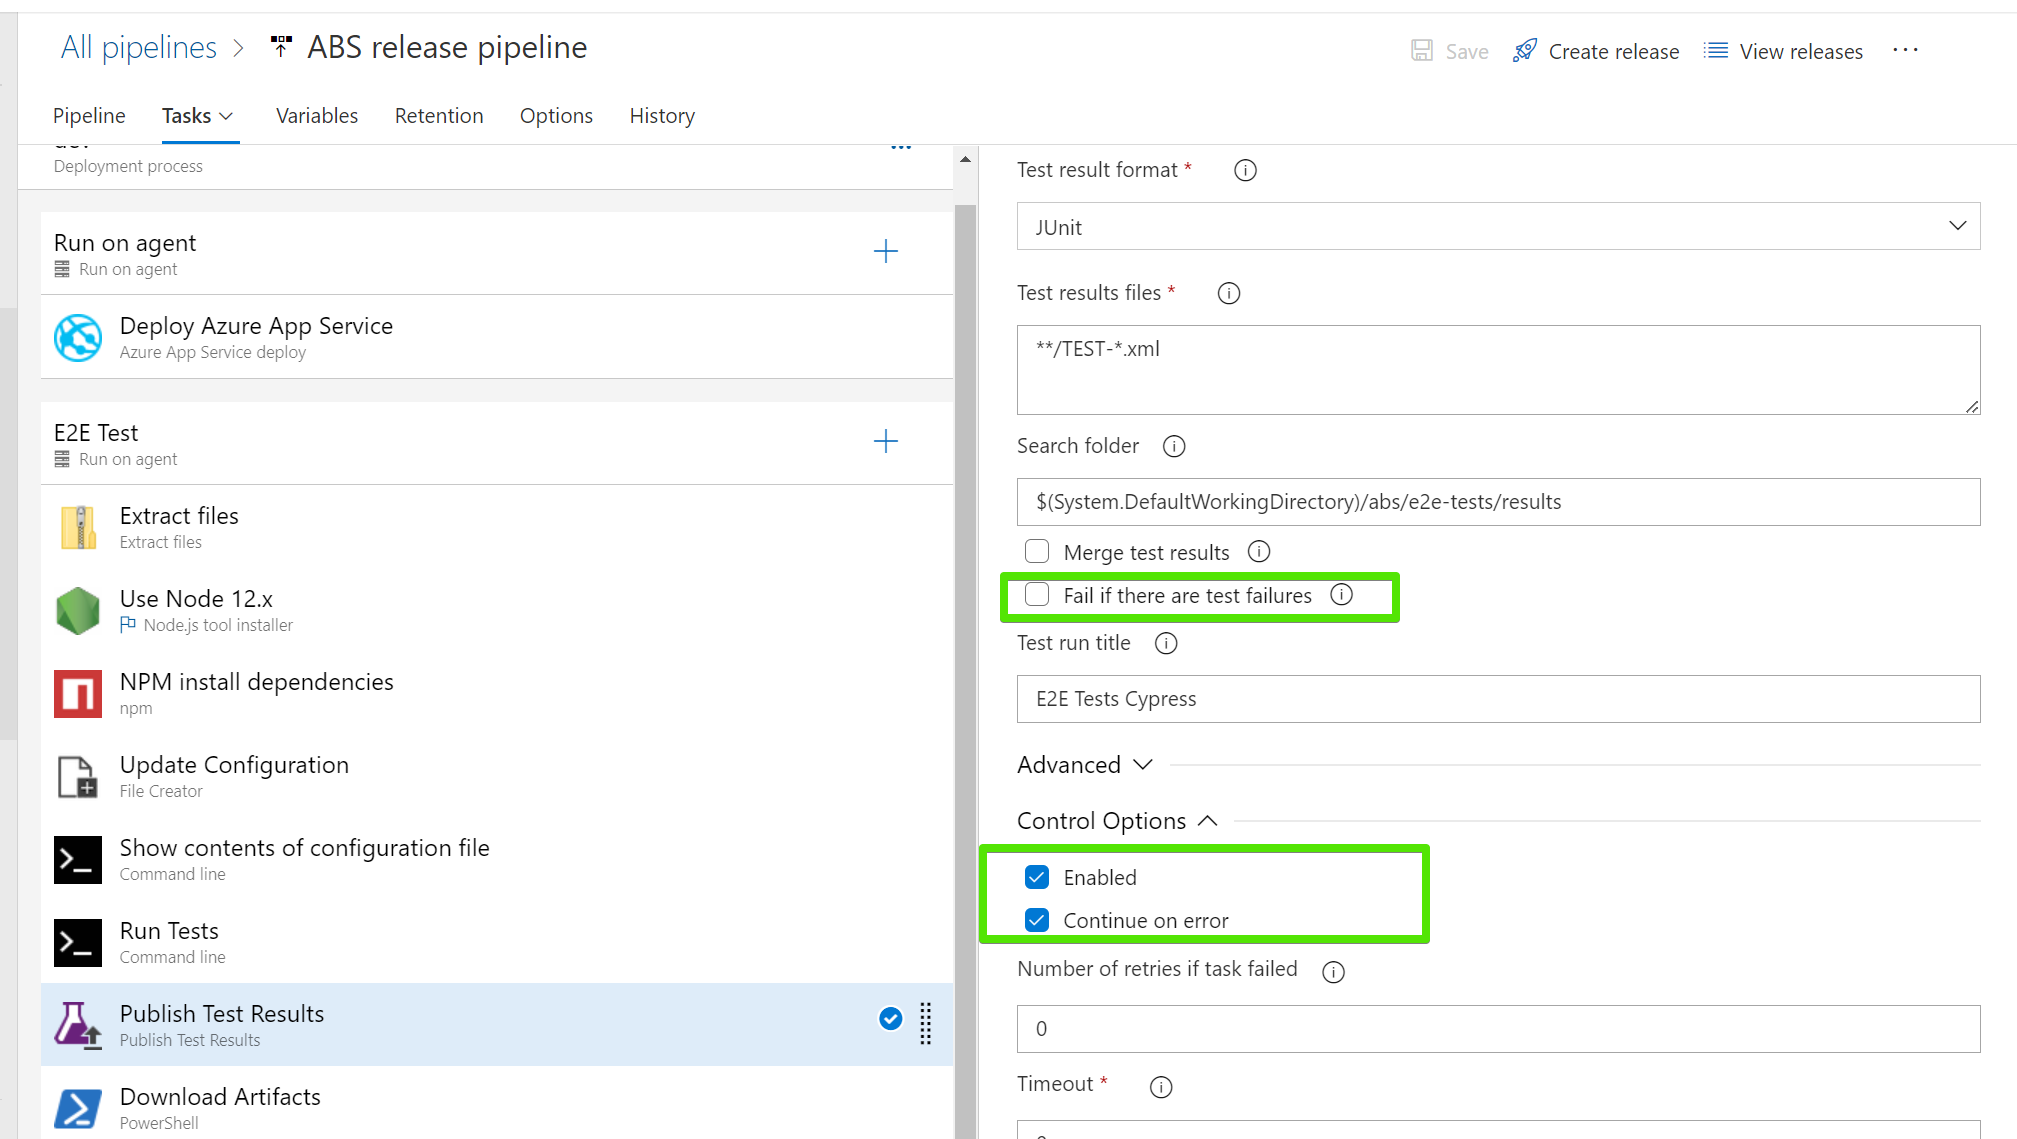
- Test Result format > JUnit
- Set JUnit as a reporter in Cypress project > cypress.config.js
- No need to install Mocha reporter (built in)
- Task > Publish Test results > Search folder
$(System.DefaultWorkingDirectory)/abs/e2e-tests/results - Task > Publish Test results > Mark > Fail if there are test failures > this will fail task and stage
- Task > Publish Test results > Control options > Run this task > Even if a previous task has failed
- Save release > add comment
- Create release
// cypress.config.js
const { defineConfig } = require("cypress");

module.exports = defineConfig({
  reporter: 'junit',
  reporterOptions: {
    mochaFile: 'results/TEST-[hash].xml',
    toConsole: true,
  },
  e2e: {
    pageLoadTimeout: 120000,
    setupNodeEvents(on, config) {
      // implement node event listeners here
    },
  },
});
Error: There Are One or More Test Failures Detected in Result Files #solved
I run Cypress tests in Azure pipeline. I can see that all my tests have passed.
However, "Publish test results" task shows "1 error. There are one or more test failures detected in result files. Detailed summary of published test results can be viewed in the Tests tab.".
Task settings are
- "test result format: JUnit;
- test result files:
**/TEST-*.xml - Fail if there are test failures"
Why "Publish test results" task has failed?
Answer
Looks like taks considers previous runs fails.
It is possible that the "Publish test results" task is failing because it is detecting test failures in the previous JUnit XML test result files in the location specified by "test result files: **/TEST-*.xml".
In such a scenario, it is recommended to clear or remove the previous test result files before running the tests again or to change the location of the test result files to a different directory that does not contain any previous test result files with failures.
Additionally, you can try to modify the "Fail if there are test failures" setting to see if the issue is resolved. If the issue persists, you may need to check the Azure DevOps pipeline logs or consult the Azure DevOps support team for more assistance.
Here are settings to fix the problem "There are one or more test failures detected in result files"
- Search folder > Fail if there are test failures: OFF
- Control options > Enabled > Continue on error.
Note: in this case release will continue. Is there a way to stop it?
6. Extracting Test Artifacts
You can write a PowerShell or command line or a bash script for a task.
PowerShell core is now available on Windows, macOS or Linux. This means that you can use PowerShell for your Azure DevOps pipeline even if the pipeline will be executed on Linux machine.
The advantage of PowerShell is simple, it runs now on every system, if you write script in PowerShell it will run on any system, it is preinstalled in Windows and you can install in macOS or Linux with very little effort.
If you are using Azure Hosted Agent, PowerShell 7 is already preinstalled and it is already available for you to use.
Links: Azure DevOps Pills: PowerShell in pipeline with Linux agents • Codewrecks, Microsoft-hosted agents for Azure Pipelines - Azure Pipelines | Microsoft Learn
Main Steps - Extracting Test Artifacts
- Edit release pipeline
- Add Powershell Task
- Add script to upload artifacts as zip file
- Save pipeline
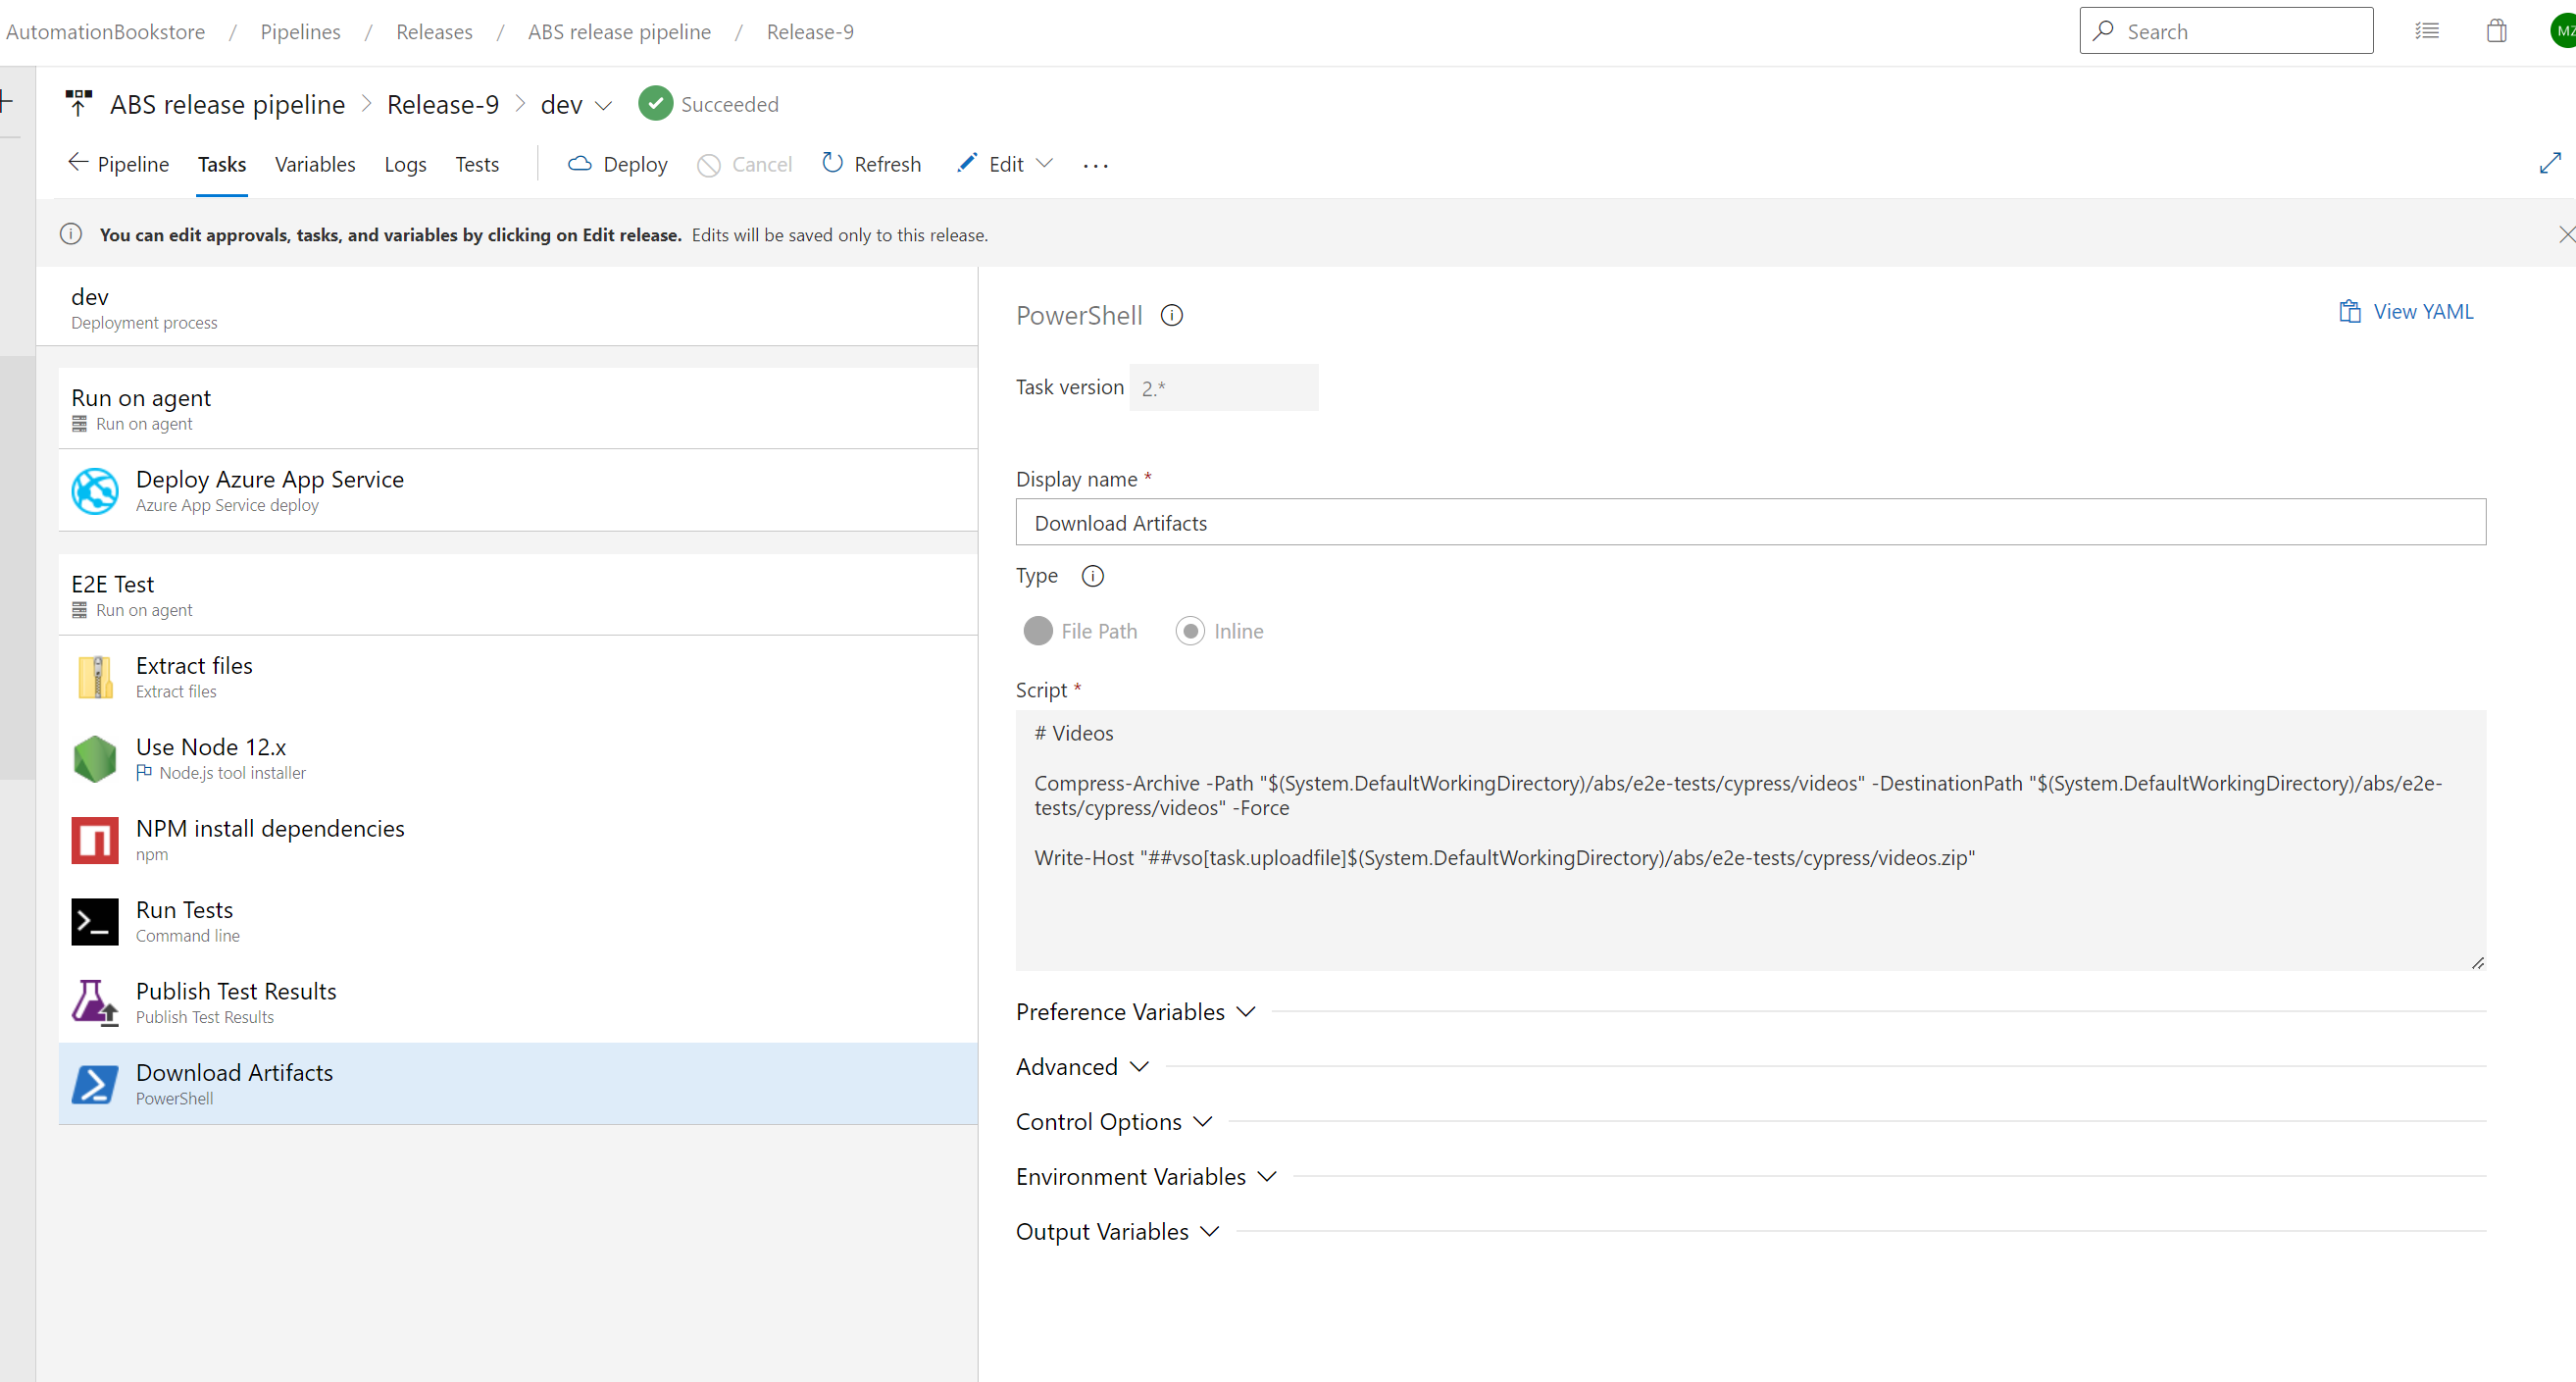
Detailed Steps - Extracting Test Artifacts
- Azure Pipelines > Edit release pipeline
- Add tasks > PowerShell > Add
- Update task name > Download artifacts
- Scrip > add script
- Save
- Create release
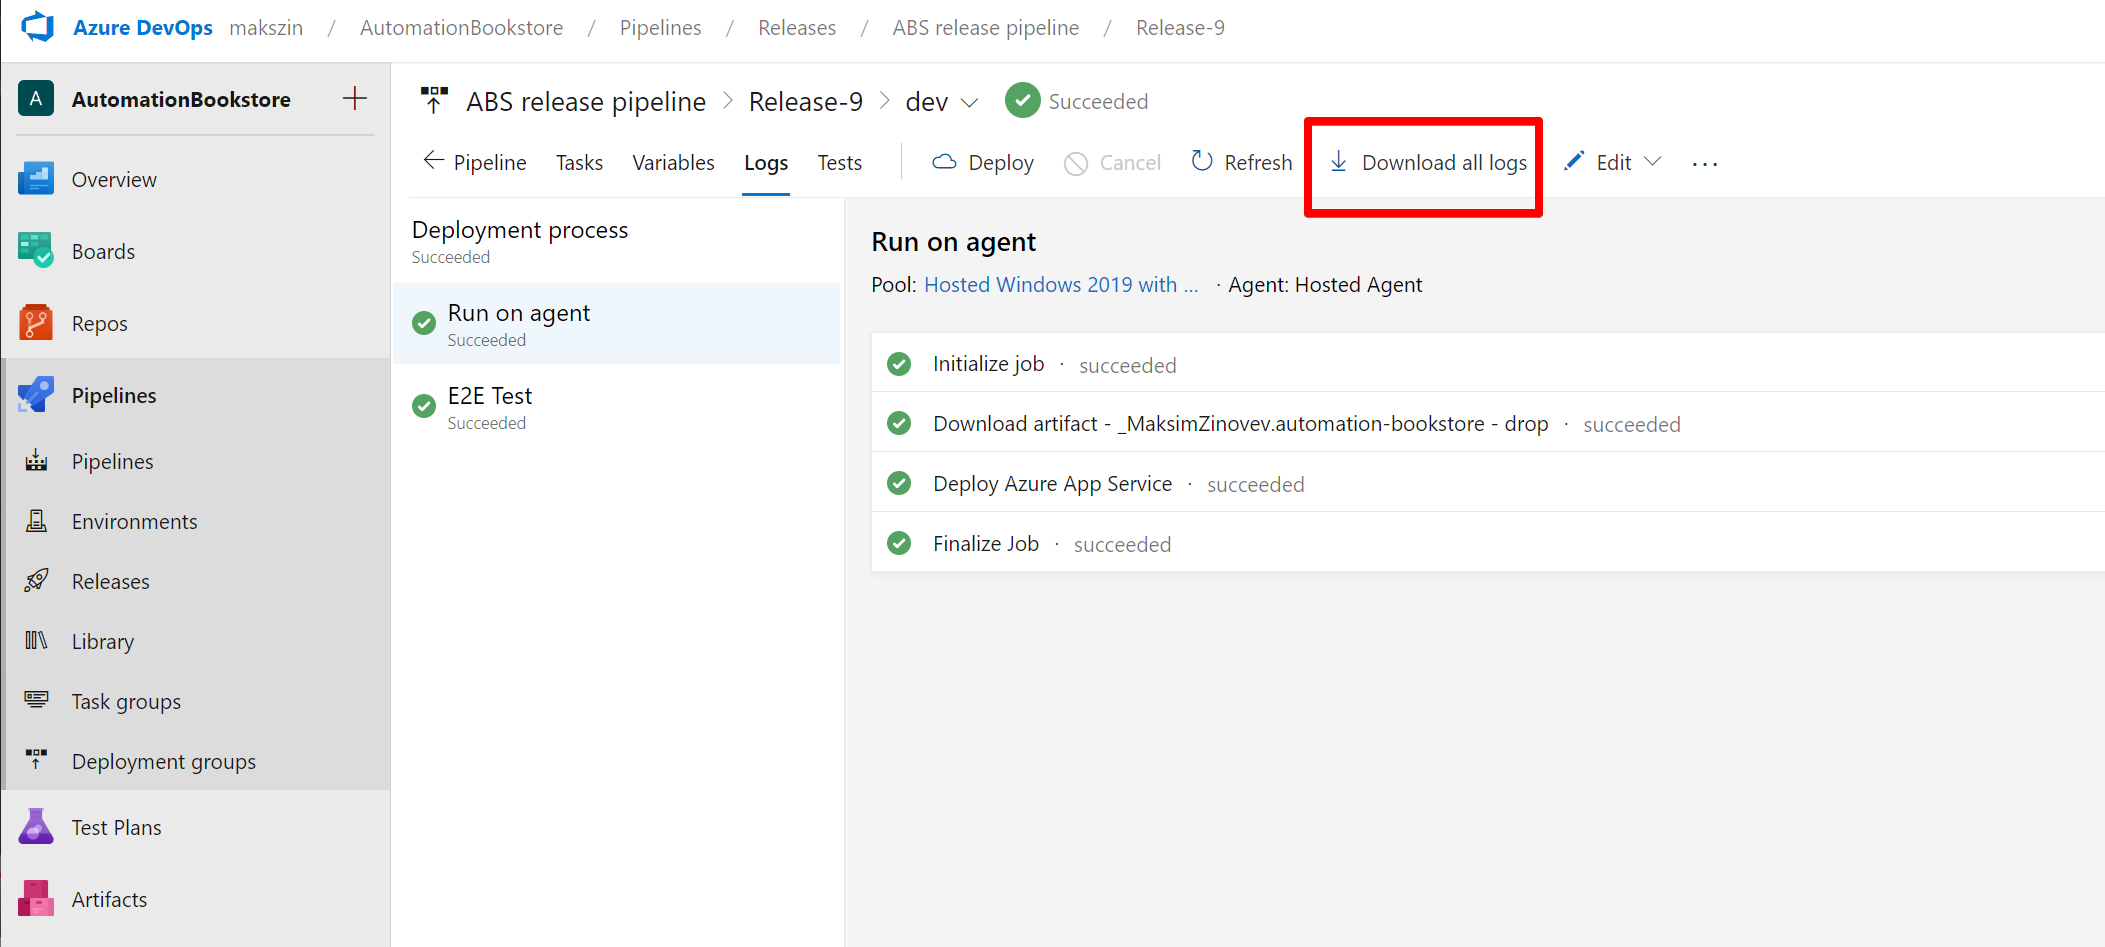
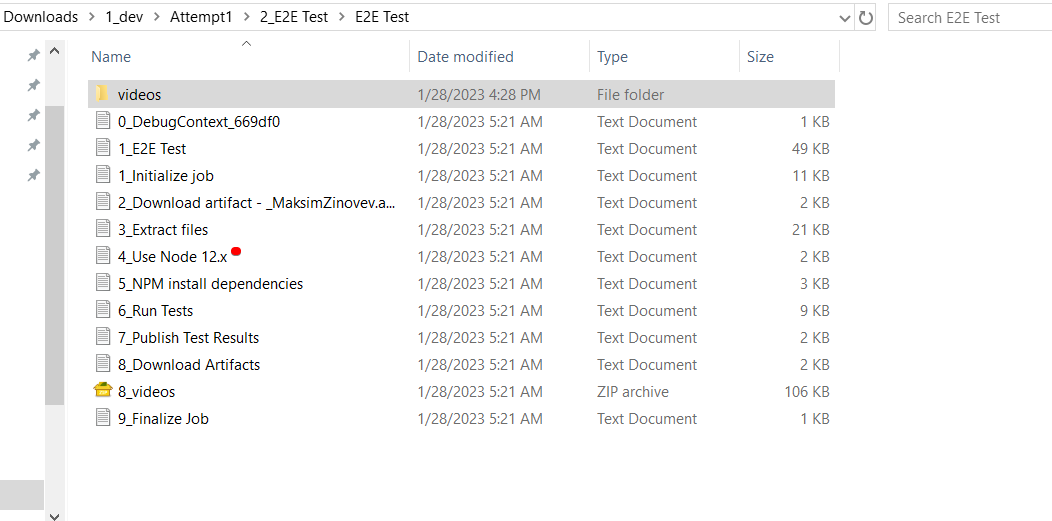
- Open release logs > Doownload all logs
# Videos

Compress-Archive -Path "$(System.DefaultWorkingDirectory)/abs/e2e-tests/cypress/videos" -DestinationPath "$(System.DefaultWorkingDirectory)/abs/e2e-tests/cypress/videos" -Force

Write-Host "##vso[task.uploadfile]$(System.DefaultWorkingDirectory)/abs/e2e-tests/cypress/videos.zip"
This PowerShell script is used in an Azure pipeline and performs the following actions:
-
Compresses the files located in the directory "
(System.DefaultWorkingDirectory)/abs/e2e-tests/cypress/videos" and the "-Force" parameter is used to overwrite any existing zip file with the same name. -
The
Write-Host "##vso[task.uploadfile]$(System.DefaultWorkingDirectory)/abs/e2e-tests/cypress/videos.zip"is uploading the compressed file to the pipeline artifact. TheWrite-Hostcmdlet is used to write a message to the pipeline log and the "##vso[task.uploadfile]" is a special syntax that tells Azure DevOps to upload the specified file as an artifact of the pipeline. The path of the file to be uploaded is "$(System.DefaultWorkingDirectory)/abs/e2e-tests/cypress/videos.zip".
"vso" stands for Visual Studio Online. It's a cloud-based platform that provides development teams with integrated tools for version control, work tracking, continuous integration and delivery, and more.
In the context of the above script, "vso" is used as a prefix for a special syntax "##vso[task.uploadfile]" that tells Azure DevOps to upload the specified file as an artifact of the pipeline. This allows the pipeline to access the file, such as videos, as an artifact for further use.
7. Project Configuration
Configurations can be used, for example, when we want to run tests in different envionments
- local host, generate html report, no application deployed to the web, only running locally
- Azure cloud, no html report, application deployed to Azure
Detailed Steps
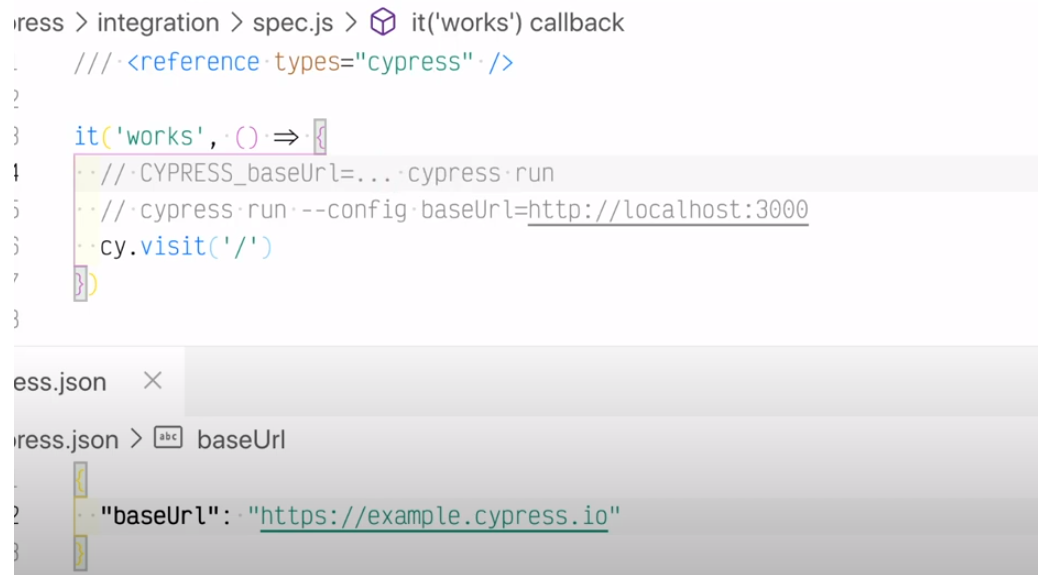
- Open Cypress project > e2e-tests > cypress.config.json > set "baseURL" > see Environment Variables | Cypress Documentation
- Update cypress tests >
cy.visit('/') - Now if this code is pushed to pipline it will fail because base url is not updated in pipeline
- Go to release pipeline > Edit
Option 1
- Jobs > E2E Tests > Run Tests > Edit
npm run test --config baseUrl=https://mzinbookstore-linux.azurewebsites.net- This will overwrith baseUrl stored in cypress configuration file
Option 2
- Stages > E2E Tests
- Add task > file creator (before "Run Tests" task)
- Display name > Update Configuration
- File path >
$(System.DefaultWorkingDirectory)/abs/e2e-tests/cypress.config.js- see below - Tick "Overwrite file if exists"
- Save pipeline
- Run pipeline
// /cypress.config.js
const { defineConfig } = require("cypress");

module.exports = defineConfig({
  baseURL: "https://mzinbookstore-linux.azurewebsites.net",
  reporter: 'junit',
  reporterOptions: {
    mochaFile: 'results/TEST-[hash].xml',
    toConsole: true,
  },
  e2e: {
    pageLoadTimeout: 120000,
    setupNodeEvents(on, config) {
      // implement node event listeners here
    },
  },
});
cypress.config.dev.json
cypress.config.qa.json
then
use npm run test --config-file cypress.config.dev.json
Using baseUrl Correctly , How to correctly use the baseUrl to visit a site in Cypress - YouTube
Main Steps
- Update Cypress config file by ading "baseUrl"
- Update Cypress tests by replacing hardcoded url with "/"
- Option 1: Add task in release pipeline: file creator
- Option 2: Pass baseUrl in CLI parameters (Run Tests task)
8. Task Groups
This is how groups of tasks can be shared.
Detailed Steps
- Azure pipelines > Edit pipeline
- Clone stage
- Change stage name
- Open cloned stage
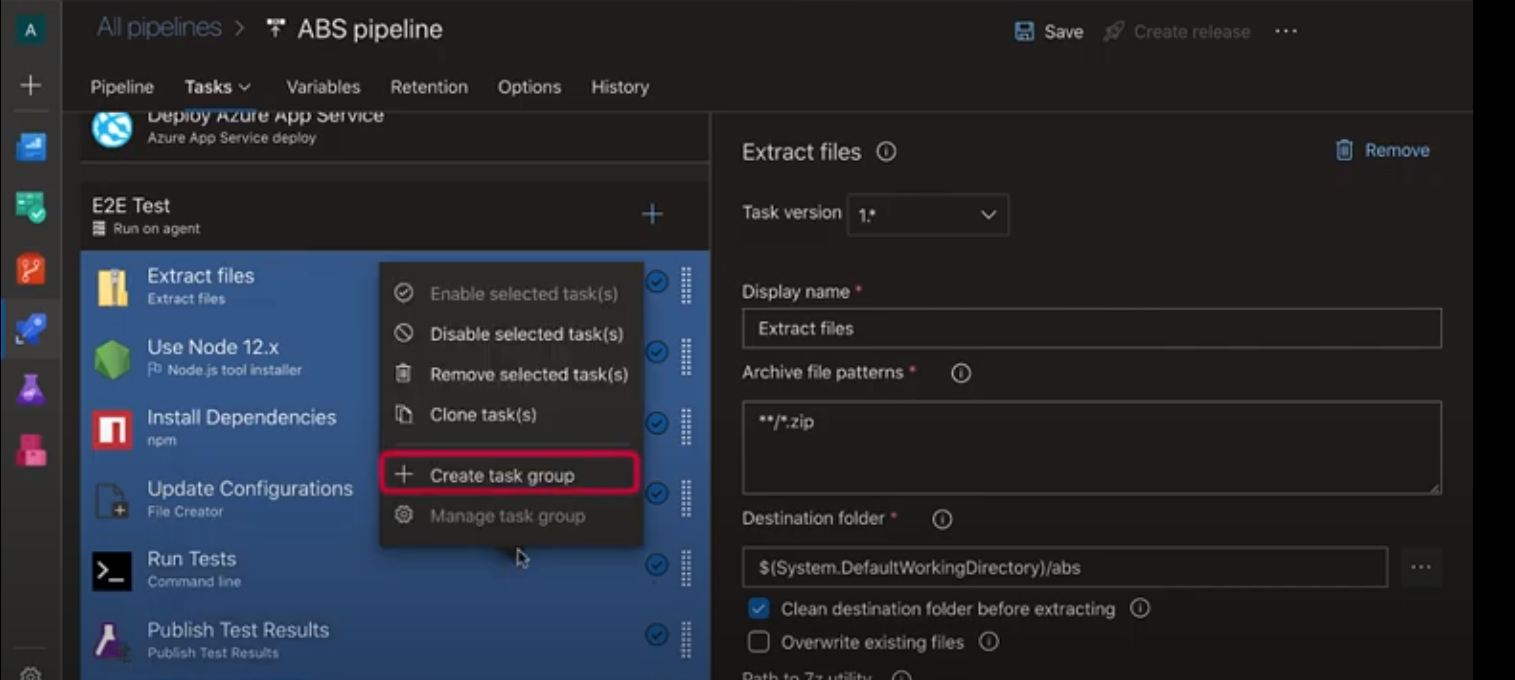
- Select tasks > right-click > create task group
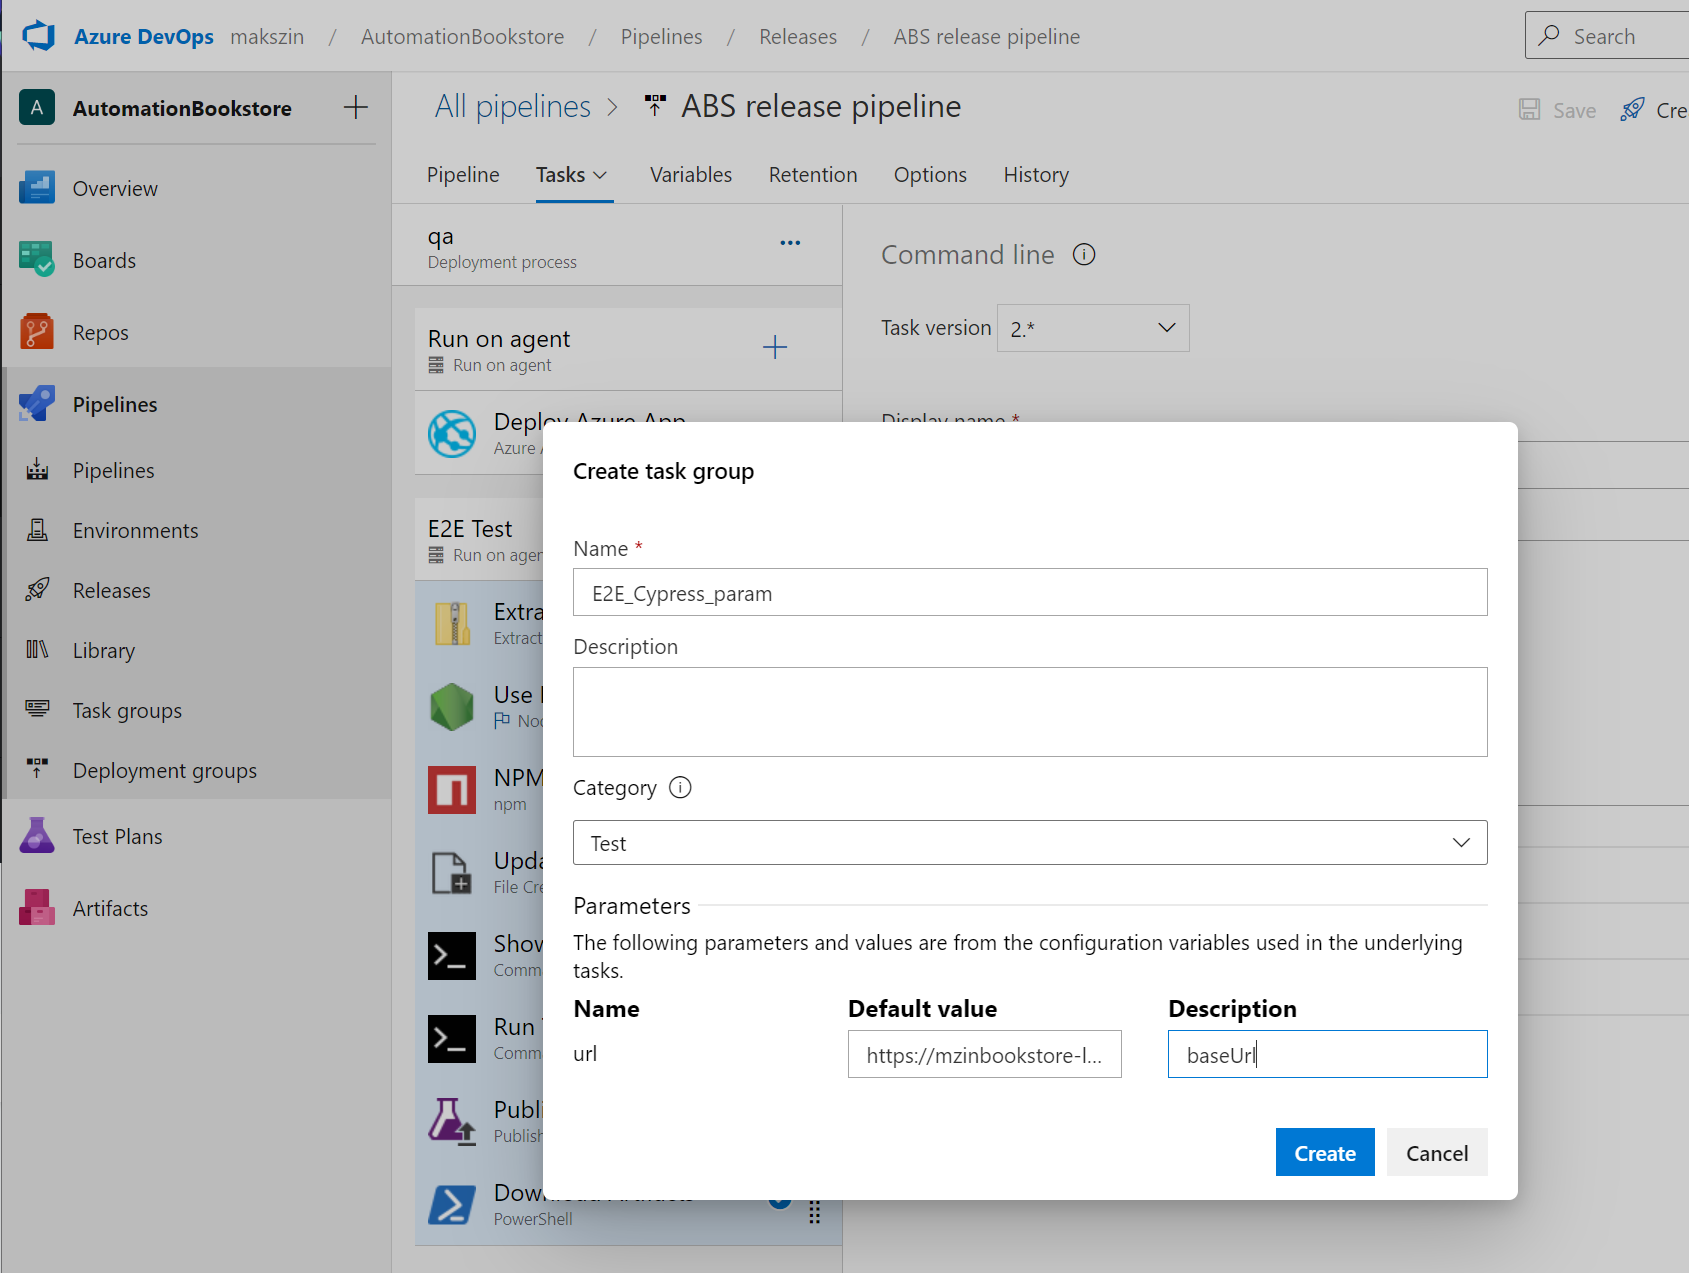
- Set name
- Set description
- Select category (e.g. "Test")
- Create
- Save stage
- Go to Pipelines > Task groups
- Click on group. You can make changes here
- Go to Release pipeline > Edit
- Add new stage
- Set name (e.g "prod")
- Agent job > click "+" button
- Search task group by name > Add
To Add Task Grout to Different Project
- Pipelines > Task groups
- Export
- In new project > Pipelines > Task groups > Import
To Create Variables in Task Groups
- Pipelines > Library
-
- Variable group
- Set name, description (e.g. "url")
- Add name/value pair(s)
- Save
- Go to pipeline > Edit task
- Replace for example
"https://mzinbookstore-linux.azurewebsites.net/"$(url)
- Save
- Now if you create task group again
- Parameters > provide default value and description
9. Parallel Test Execution
Parallel execution of the test is one of the ways to avoid continuous testing becoming a bottleneck in the pipeline.
The most obvious candidate for parallel testing is running tests with multiple configurations.
That is - when we need to run the same suite of tests with different configurations, like on different browsers, different viewpoints, and so on
Detailed Steps
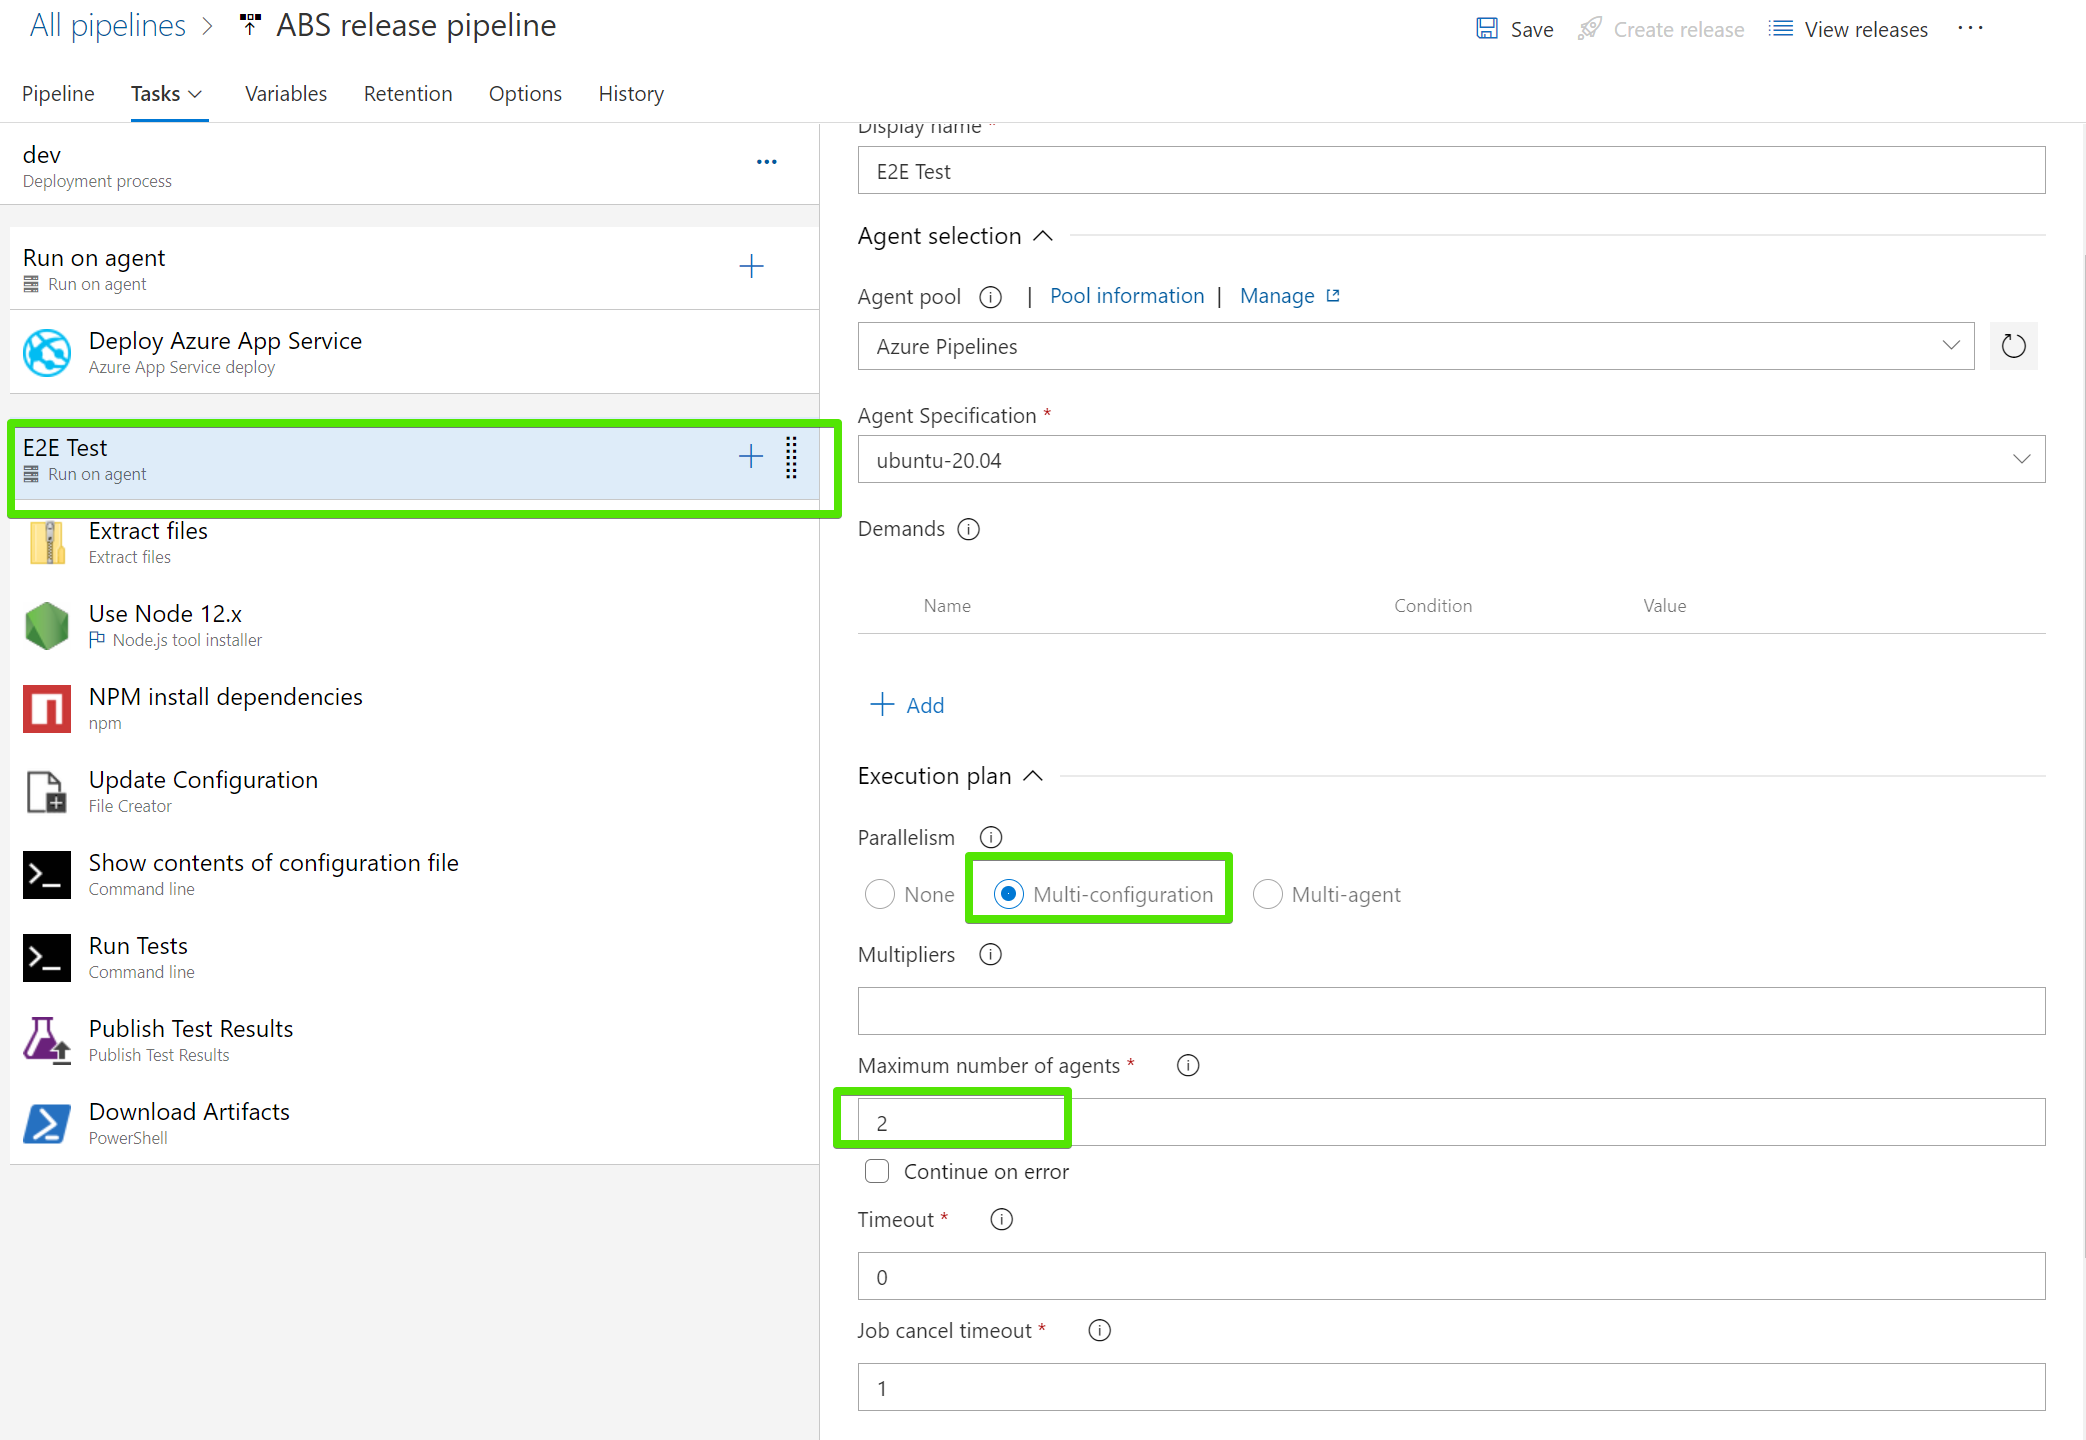
- Pipeline > Edit > E2E Tests > Execution plan
- Select Parallelism > Multi-configuration
- Multiplier > Browser (this is configuration variable)
- Max number of agents > 2 (will run for 2 different browsers)
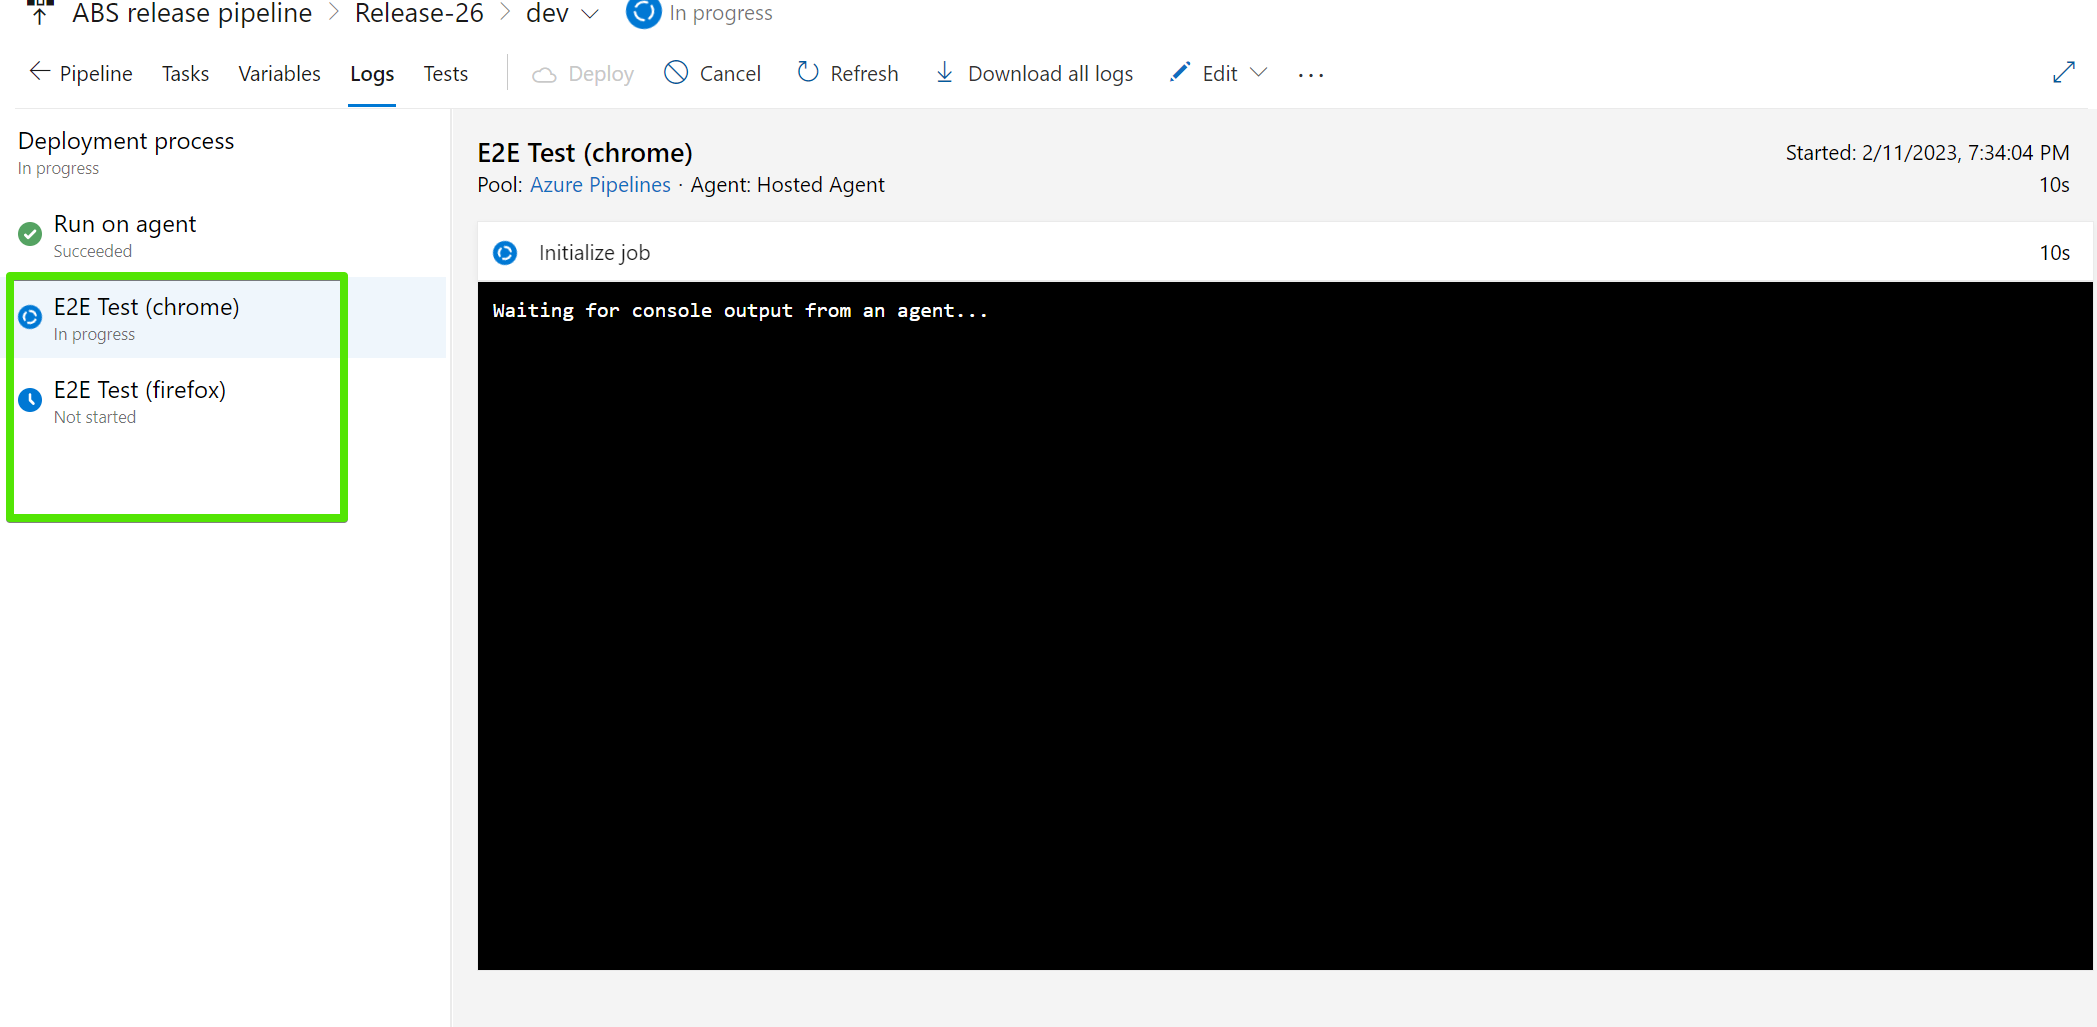
- Select "Variables" tab
- Name: Browser
- Value: chrome, firefox
- Tasks tab > Run Tests (command line) > add cli parameters
- Tasks tab > Publish tests results > Test run title >
E2E Tests Cypress - $(Browser) - Save
- Create release
npm run test -- --browser $(Browser) --headless
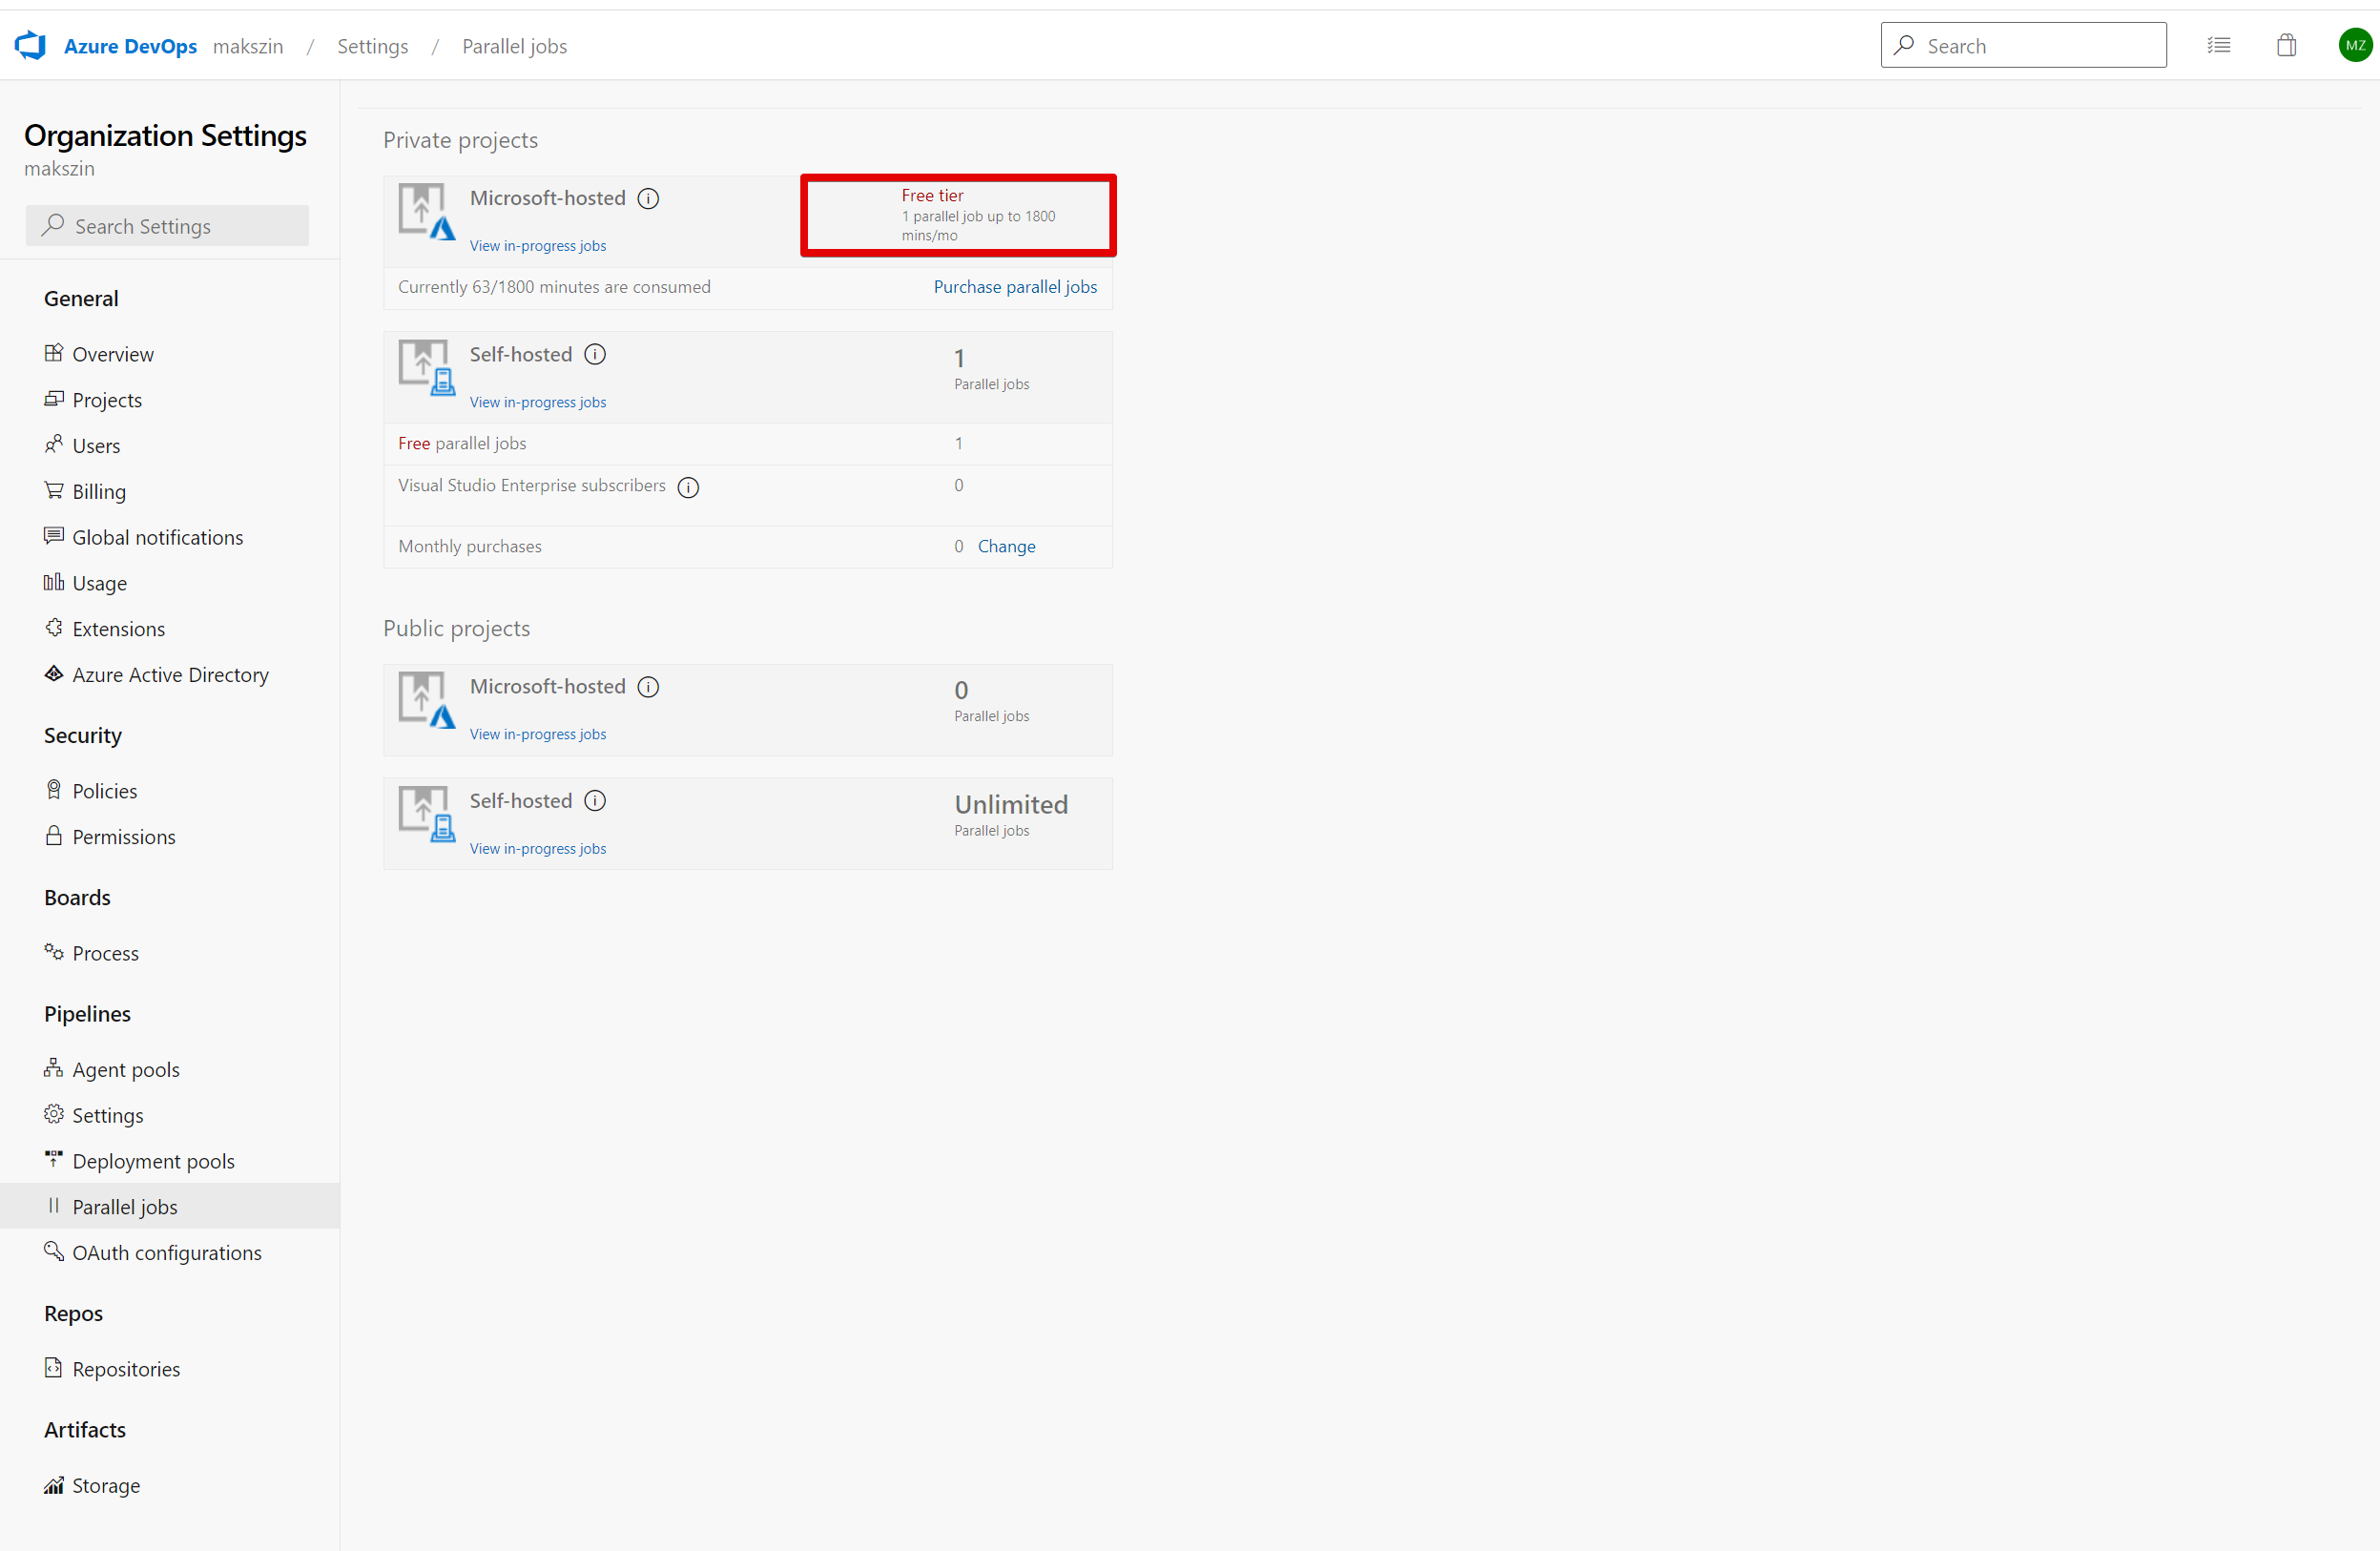
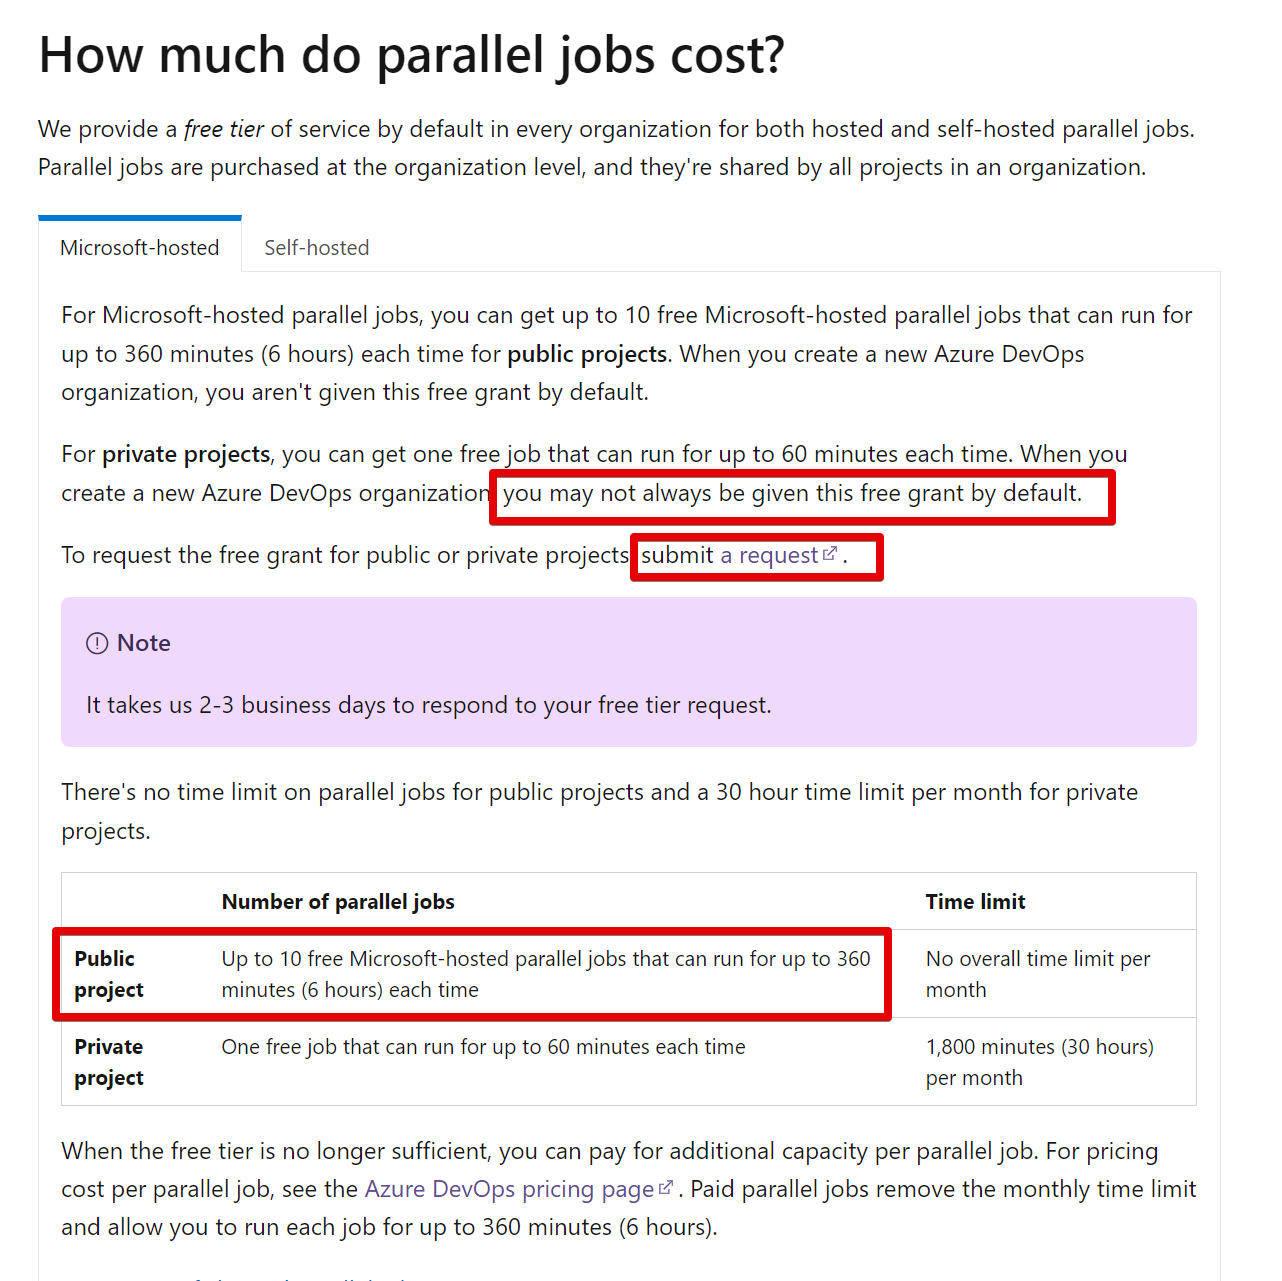
By default, when you use free tier, your organization has
- only 1 parallel job for private projects
- may not always be given this free grant by default. To request the free grant for public or private projects, submit a request.
- Azure DevOps Services Pricing | Microsoft Azure
- Run any tests in parallel - Azure Pipelines | Microsoft Learn
Unable to process command '##vso[task.uploadfile]/home/vsts/work/r1/a/abs/e2e-tests/cypress/videos.zip' successfully. Please reference documentation (http://go.microsoft.com/fwlink/?LinkId=817296)

Value cannot be null. (Parameter 'Cannot upload task attachment file, attachment file location is not specified or attachment file not exist on disk')
10. Working with Failing Tests
In case some tests failed, there are 2 options
- Update the code to fix issue. Pipeline will be automatically triggered
- Run pipeline again
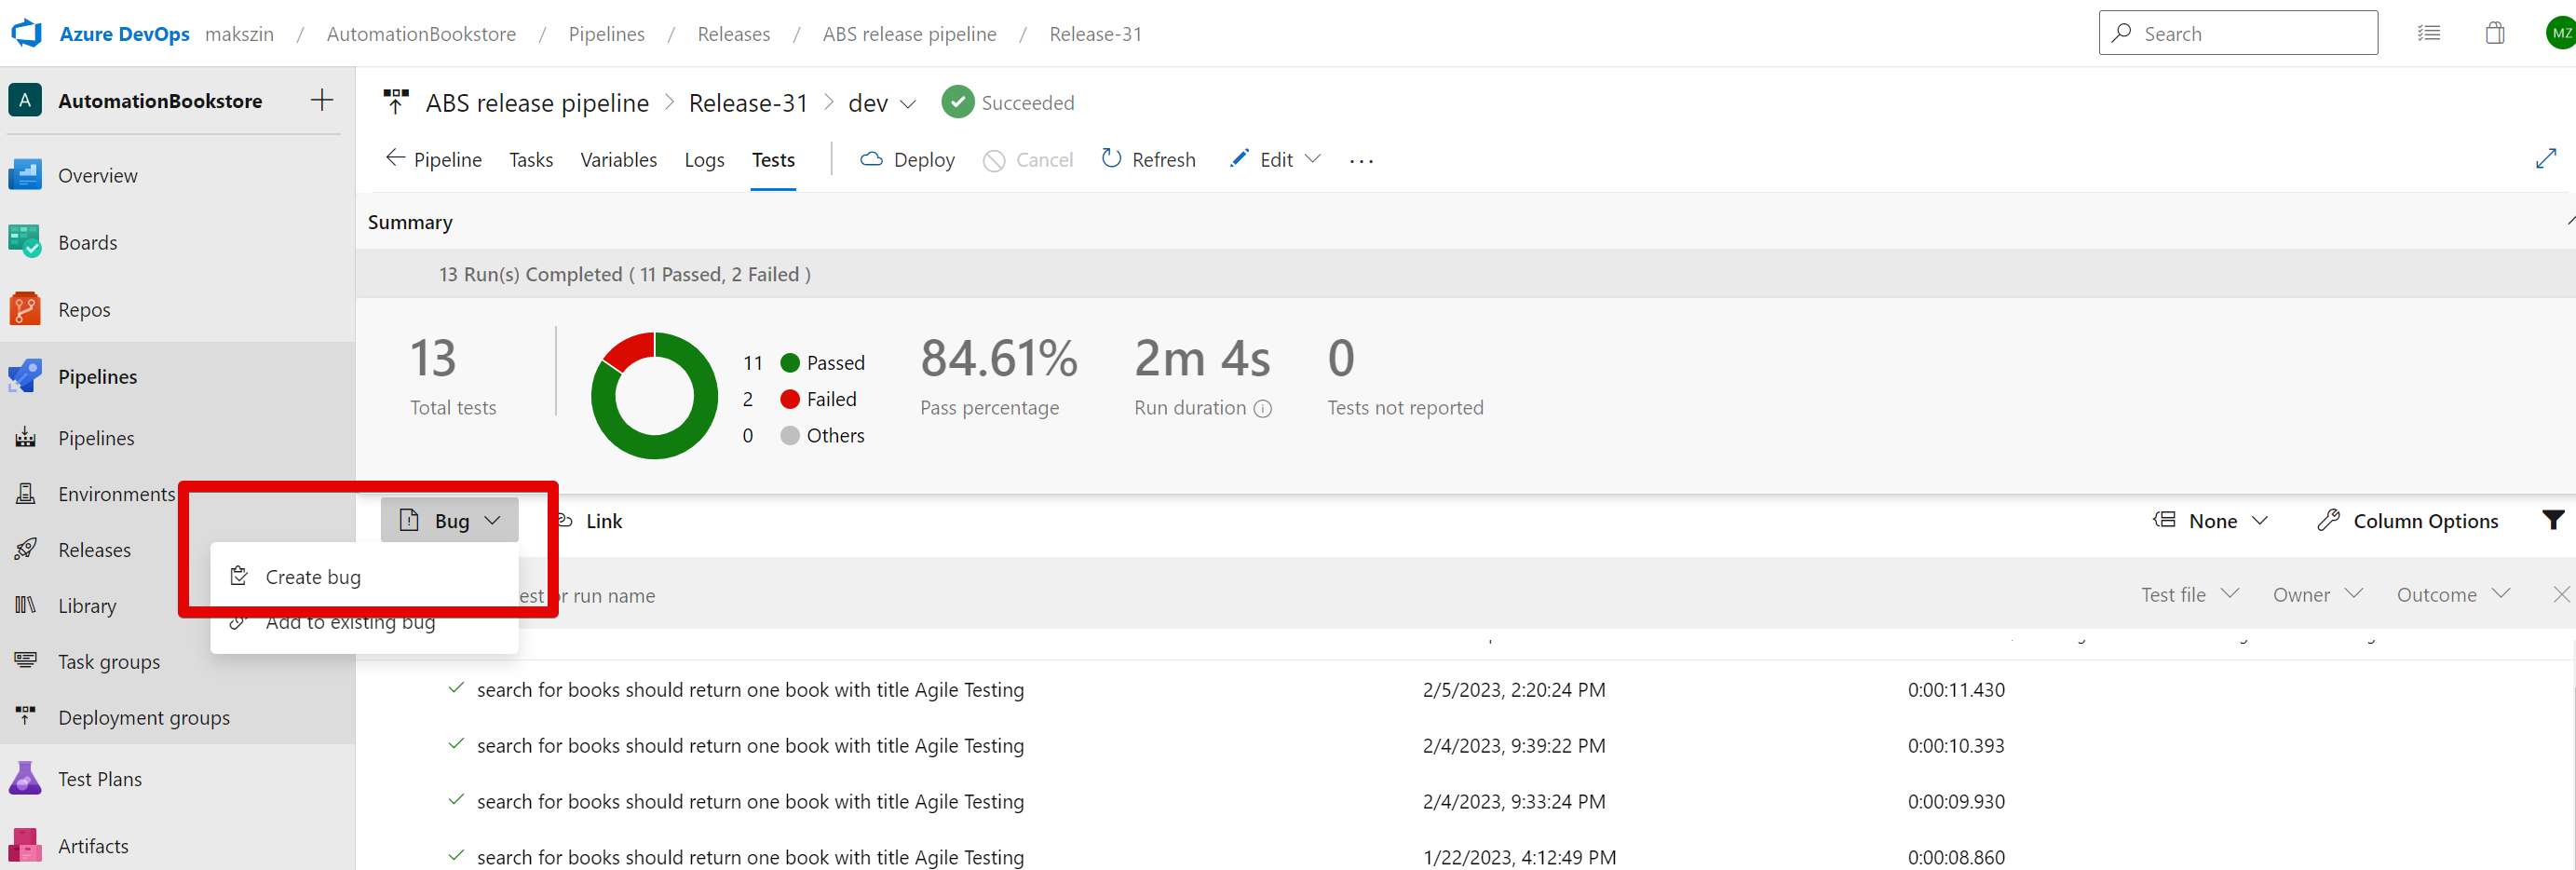
In case there is a bug, Azure DevOps allows creating bug from test results
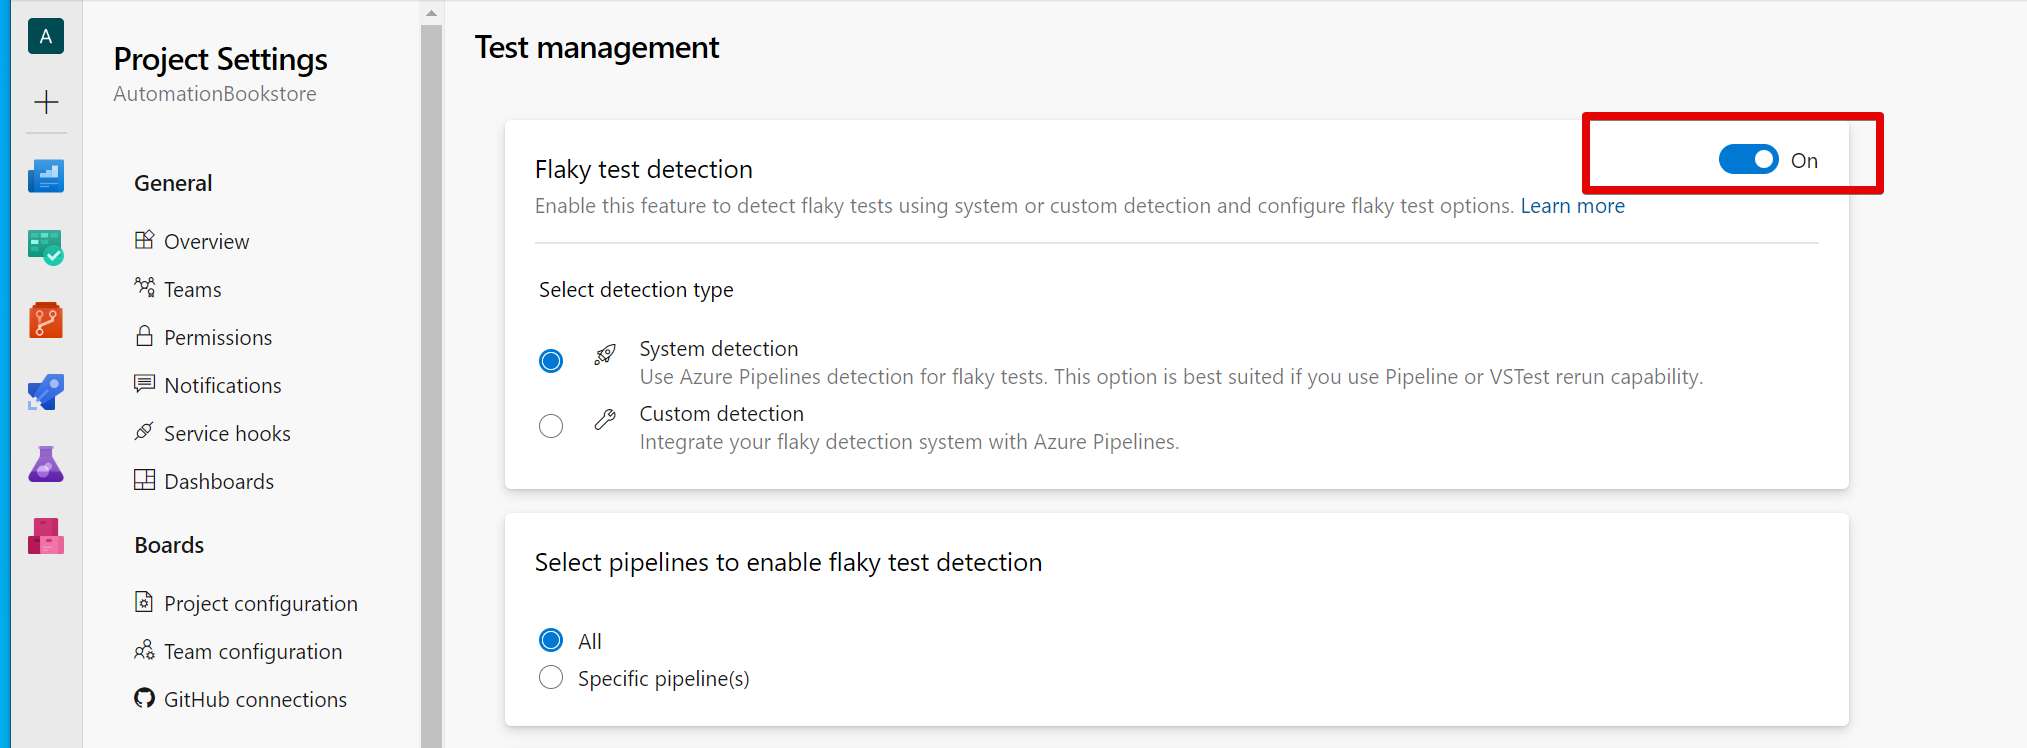
The following settings control pipeline failures
- OFF - pipeline will fail if flaky tests failed
- ON - pipeline will NOT fail if flaky tests failed
11. Multi-stage YAML Pipeline
- Duplicate project with source code and tests. Create separate GitHub repo
- Create yaml file for Azure pipeline.
- Can use VS Code extension microsoft/azure-pipelines-vscode
- ensure web app name matches your web app name
WebAppName: 'mzinbookstore-linux' - ensure subscription matches your subscription name
azureSubscription: "Azure subscription 1 (324b5154-997f-4805-8ce2-66911f1ae942)" - push changes to repo
- Create new private project in Azure org.
- Go to project Settings > Pipelines Service connections > Add service connection > Subscription Resource group. Prerequisites: Web App should be already created. See Create a static HTML web app in Azure using Cloudshell CLI or Quickstart: Building your first static site with the Azure Static Web Apps | Microsoft Learn
- Ensure checkbox is enabled "Grant access permission to all pipe˜lines"
- Azure org > Pipelines > create new pipeline
- Where is your code > Git > Select your repository
Pipeline:
# HTML
# Archive your static HTML project and save it with the build record.
# Add steps that build, run tests, deploy, and more:
# https://aka.ms/yaml
# test

trigger:
  - master

stages:
  - stage: Build
    jobs:
      - job: BuildWebApp
        pool:
          vmImage: ubuntu-latest
        steps:
          - task: ArchiveFiles@2
            inputs:
              rootFolderOrFile: "$(build.sourcesDirectory)"
              includeRootFolder: false
          - task: PublishBuildArtifacts@1

  - stage: Dev
    jobs:
      - job: Deploy
        pool:
          vmImage: ubuntu-latest
        steps:
          - task: DownloadBuildArtifacts@0
            inputs:
              buildType: "current"
              downloadType: "single"
              artifactName: "drop"
              downloadPath: "$(System.DefaultWorkingDirectory)"
          - task: AzureRmWebAppDeployment@4
            inputs:
              ConnectionType: "AzureRM"
              azureSubscription: "Azure subscription 1 (324b5154-997f-4805-8ce2-66911f1ae942)"
              appType: 'webApp'
              WebAppName: 'mzinbookstore-linux'
              packageForLinux:  "$(System.DefaultWorkingDirectory)/**/*.zip"
Config:
              {
                "baseUrl": "$",
                "reporter": "junit",
                "reporterOptions": {
                  "mochaFile": "results/TEST-[hash].xml",
                  "toConsole": true
                }
              },
steps_test.yml
parameters:
- name: url
  default: "https://mzinbookstore-linux.azurewebsites.net"
- name: browser
  default: chrome
steps:
- task: DownloadBuildArtifacts@0
  displayName: "Download Build Artifacts"
  inputs:
    buildType: "current"
    downloadType: "single"
    artifactName: "drop"
    downloadPath: "$(System.DefaultWorkingDirectory)"
- task: ExtractFiles@1
  displayName: "Extract Files"
  inputs:
    destinationFolder: "$(System.DefaultWorkingDirectory)/abs"
- task: NodeTool@0
  displayName: "Use Node 12.x"
  inputs:
    versionSpec: 12.x
- task: Npm@1
  displayName: "Install Dependencies"
  inputs:
    command: ci
    workingDir: "$(System.DefaultWorkingDirectory)/abs/e2e-tests"
    verbose: false
- script: "npm run test --browser $ --headless"
  workingDirectory: "$(System.DefaultWorkingDirectory)/abs/e2e-tests"
  displayName: "Run Tests"
  env:
    BASE_URL: $
- task: PublishTestResults@2
  displayName: "Publish Test Results"
  inputs:
    searchFolder: "$(System.DefaultWorkingDirectory)/abs/e2e-tests/results"
    failTaskOnFailedTests: false
    testRunTitle: "End-To-End Tests - $"
  condition: succeededOrFailed()
- task: PowerShell@2
  displayName: "Compress and Upload Artifacts"
  inputs:
    targetType: "inline"
    script: |
      # Compress videos
      zip -rv "$(System.DefaultWorkingDirectory)/abs/e2e-tests/cypress/videos.zip" "$(System.DefaultWorkingDirectory)/abs/e2e-tests/cypress/videos"

      # Upload artifact
      Write-Host "##vso[artifact.upload containerfolder=videos;artifactname=myvideos]$(System.DefaultWorkingDirectory)/abs/e2e-tests/cypress/videos.zip" -Debug
  condition: succeededOrFailed()
azure-pipelines.yml:
trigger:
  - main

stages:
  - stage: Build
    jobs:
      - job: BuildWebApp
        pool:
          vmImage: ubuntu-latest
        steps:
          - task: ArchiveFiles@2
            displayName: "Archive Files"
            inputs:
              rootFolderOrFile: "$(build.sourcesDirectory)"
              includeRootFolder: false
          - task: PublishBuildArtifacts@1
            displayName: "Publish Build Artifacts"
            condition: succeededOrFailed()

  - stage: Dev
    jobs:
      - job: Deploy
        pool:
          vmImage: ubuntu-latest
        steps:
          - task: DownloadBuildArtifacts@0
            inputs:
              buildType: "current"
              downloadType: "single"
              artifactName: "drop"
              downloadPath: "$(System.DefaultWorkingDirectory)"
          - task: AzureRmWebAppDeployment@4
            inputs:
              ConnectionType: "AzureRM"
              azureSubscription: "absServiceConnection"
              appType: 'webApp'
              WebAppName: 'mzinbookstore-linux'
              packageForLinux:  "$(System.DefaultWorkingDirectory)/**/*.zip"

      - job: Test
        dependsOn: Deploy
        pool:
          vmImage: ubuntu-latest
        steps:
          - template: steps_test.yml
            parameters:
              url: "https://mzinbookstore-linux.azurewebsites.net"
              browser: "chrome"
10. Resolving Issue in Upload Artifacts Task PowerShell Script
Solution 1
Compress-Archive was causing error
Exception calling "ShouldProcess" with "1" argument(s): "PowerShell is in NonInteractive mode. Read and Prompt functionality is not available."
It was solved with
PowerShell's "ShouldProcess" is used to confirm actions, but it doesn't work well in non-interactive contexts.
The error suggests that PowerShell is running non-interactively.
Since Linux-based agent is used, there could be platform-related differences in behavior.
The conclusion is that the issue might be caused by using Compress-Archive (a PowerShell cmdlet) in a non-interactive mode on a Linux-based agent.
To troubleshoot, we use native Linux commands (zip) that work better in a non-interactive context.
- task: PowerShell@2
  displayName: "Compress and Upload Artifacts"
  inputs:
    targetType: "inline"
    script: |
      # Compress videos
      zip -rv "$(System.DefaultWorkingDirectory)/abs/e2e-tests/cypress/videos.zip" "$(System.DefaultWorkingDirectory)/abs/e2e-tests/cypress/videos"

      # Upload artifact
      Write-Host "##vso[artifact.upload containerfolder=videos;artifactname=myvideos]$(System.DefaultWorkingDirectory)/abs/e2e-tests/cypress/videos.zip" -Debug
Solution 2
In Azure Pipelines, you can use the PublishPipelineArtifact task to publish the logs as an artifact, and then download the artifact using the DownloadPipelineArtifact task.
Here's an example of how you can modify your YAML pipeline to achieve this:
- task: PowerShell@2
  displayName: 'Download and Publish Logs as Artifact'
  inputs:
    targetType: 'inline'
    script: |
      # Download all logs
      $logsPath = "$(Agent.TempDirectory)/logs"
      Get-ChildItem -Recurse -Path "$(Agent.BuildDirectory)" -Filter '*.log' | Copy-Item -Destination $logsPath

      # Publish logs as an artifact
      Publish-PipelineArtifact -Path $logsPath -ArtifactName 'Logs' -ArtifactType 'Container'

- task: DownloadPipelineArtifact@2
  displayName: 'Download Logs Artifact'
  inputs:
    artifactName: 'Logs'
    targetPath: '$(System.ArtifactsDirectory)/Logs'
This script will download all log files from the build run and publish them as an artifact named 'Logs'. Then, the DownloadPipelineArtifact task will be used to download the artifact to the specified target path ($(System.ArtifactsDirectory)/Logs in this case).
11. Resolving Authorization Issue in Azure DevOps
There was a resource authorization issue: "The pipeline is not valid. Job Deploy: Step AzureRmWebAppDeployment input ConnectedServiceName references service connection Training (324b5154-997f-4805-8ce2-66911f1ae942) which could not be found. The service connection does not exist or has not been authorized for use. For authorization details, refer to https://aka.ms/yamlauthz."
12. Useful Azure CLI Commands
Creates/updates a web app with name 'mzinbookstore-linux' in 'eastasia' location with HTML & Node.js runtime.
az webapp up --location eastasia --name mzinbookstore-linux --html --plan maksimzinovevsubmit_asp_7478 --resource-group maksimzinovevsubmit_rg_abookstore-linux --os-type Linux --runtime "node|10.10"
Shows the deployment log of the 'mzinbookstore-linux' web app.
az webapp log deployment show --name mzinbookstore-linux --resource-group maksimzinovevsubmit_rg_abookstore-linux
Creates/updates a web app with name 'mzinbookstore-linux' in 'eastasia' location with Node.js 18 LTS runtime.
az webapp up --location eastasia --name mzinbookstore-linux --plan maksimzinovevsubmit_asp_7478 --resource-group maksimzinovevsubmit_rg_abookstore-linux --os-type Linux --runtime "NODE:18-lts"
Displays the version of Azure CLI installed.
az --version
Lists available runtimes for web apps in Azure.
az webapp list-runtimes
Creates/updates a web app with name 'mzinbookstore-linux' in 'eastasia' location with PHP 8.1 runtime.
az webapp up --location eastasia --name mzinbookstore-linux --plan maksimzinovevsubmit_asp_7478 --resource-group maksimzinovevsubmit_rg_abookstore-linux --os-type Linux --runtime "PHP:8.1"
Shows the subscription details of 'mzinbookstore-linux' web app.
az webapp show --name mzinbookstore-linux --resource-group maksimzinovevsubmit_rg_abookstore-linux --query 'subscription'
Shows the details of 'mzinbookstore-linux' web app.
az webapp show --name mzinbookstore-linux --resource-group maksimzinovevsubmit_rg_abookstore-linux
Shows the details of a specific Azure pipeline.
az pipelines show --name MaksimZinovev.automation-bookstore-yaml --organization https://dev.azure.com/makszin --project AutomationBookstore --detect false
13. Deploying to Multiple Environments
We can trigger build in QA env using command line:
az login
az pipelines run --name automation-bookstore-yaml-dev-qa --parameters manualTriggerDEV=false manualTriggerQA=true --org https://dev.azure.com/makszin -p AutomationBookstoreYaml --branch multiple-env
az pipelines run --pipeline
automation-bookstore-yaml-dev-qa --parameters manualTriggerDEV=true manualTriggerQA=true
By default only DEV env is deployed:
parameters:
- name: manualTriggerDEV
  type: boolean
  default: true
- name: manualTriggerQA
  type: boolean
  default: false

trigger:
- multiple-env


variables:
  # Azure Resource Manager connection created during pipeline creation
  azureSubscription: 'absServiceConnection'

  # Web app name
  webAppName: 'mzinbookstore-linux'

  # Environment name
  environmentName: 'mzinbookstore-linux'

  # Package or folder path
  packageFolderPath: '$(System.DefaultWorkingDirectory)/'

  # Agent VM image name
  vmImageName: 'ubuntu-latest'

  manualTriggerDEV: $
  manualTriggerQA: $

stages:
- stage: Build
  displayName: Build Web App Stage
  jobs:
  - job: Build
    pool:
      vmImage: $(vmImageName)
    steps:
    - script: echo Hello, world!
      displayName: 'Run a one-line script'
    - task: ArchiveFiles@2
      inputs:
        rootFolderOrFile: '$(System.DefaultWorkingDirectory)'
        includeRootFolder: false
        archiveType: 'zip'
        archiveFile: '$(Build.ArtifactStagingDirectory)/$(Build.BuildId).zip'
        replaceExistingArchive: true
    - task: PublishBuildArtifacts@1
      inputs:
        pathtoPublish: '$(Build.ArtifactStagingDirectory)/$(Build.BuildId).zip'
        artifactName: 'drop'
        publishLocation: 'Container'

- stage: Dev
  displayName: 'Dev stage'
  condition: and(eq(variables.manualTriggerDEV, true), succeeded('Build'))
  dependsOn: Build
  jobs:
  - template: deploy_and_test.yml
    parameters:
      environmentName: $(environmentName)
      webAppName: $(webAppName)
      azureSubscription: $(azureSubscription)
      packageFolderPath: $(packageFolderPath)
      url: "https://mzinbookstore-linux.azurewebsites.net"
      browser: "chrome"

- stage: QA
  displayName: 'QA stage'
  condition: and(eq(variables.manualTriggerQA, true), succeeded('Build'))
  dependsOn: Build
  jobs:
  - template: deploy_and_test.yml
    parameters:
      environmentName: "mzinbookstore-linux"
      webAppName: $(webAppName)
      azureSubscription: $(azureSubscription)
      packageFolderPath: $(packageFolderPath)
      url: "https://mzinbookstore-linux.azurewebsites.net"
      browser: "chrome"